User Guide
Overview
InfoConnect Hub is a no-code smart IBM i integration solution featuring a powerful user-friendly web interface (from version 4.1.0).
The functionality includes API-enabling IBM i business logic, replicating IBM i data in real time, and automating user actions on the green screen. The product can be deployed on any Java enabled infrastructure, including on-prem and cloud environments as well as directly on IBM i, either as a stand-alone component or in combination with other Infoview products (such as InfoCDC change data capture solution) and other integration services (API manager, messaging or event streaming platforms, etc.) to fit customers' specific infrastructure and functional requirements.
InfoConnect Hub provides an out-of-the-box dynamic secure MCP server that allows AI agents and chatbots to discover and execute Hub Program Call APIs and Screen Automation APIs via AI workflows (from version 4.0.0).
This guide will walk you through the primary features and workflows of the Hub and its web interface.
IBM i Prerequisites
- IBM i OS version: V5R4 and higher
- The Hub must be able to reach the IBM i servers on ports 446, 449, 8470, 8472,8473,8475, and 8476 for non-SSL communications, and ports 448, 449, 9470, 9472, 9473, 9475, and 9476 accessible for SSL communications.
- IBM i must have *CENTRAL, *DTAQ, *RMTCMD, *SIGNON and *SRVMAP host servers running in the QSYSWRK subsystem
- If a secure TLS connection is used, the TLS certificate must be applied to Central, Data Queue, Remote Command, File, Signon, and DDM / DRDA services in Digital Certificate Manager
- IBM i user ID must be authorized to perform the operations on the intended IBM i objects
- If there is an additional security software that locks down the remote execution functionality, the IBM i user ID defined for connector configuration must be allowed to execute remote calls and access database, IFS, and DDM services
Hub Infrastructure Prerequisites
- Java 17 or higher
- Moderately sized physical / virtualized / container-based environment – the exact server sizing depends on the usage and transaction volumes
- Network accessibility to the Hub instance for users and integrated services
Quick Start Guide
This guide covers the initial installation of the Hub and the first steps in using the web interface.
Installation and Launch
- Contact Infoview to get the Hub distribution package and a trial license, or launch the Hub from the participating marketplaces such as AWS Marketplace or Azure Marketplace
- Download the Hub archive on any Java supported on-prem or cloud infrastructure, including IBM i, and extract into the intended product home directory
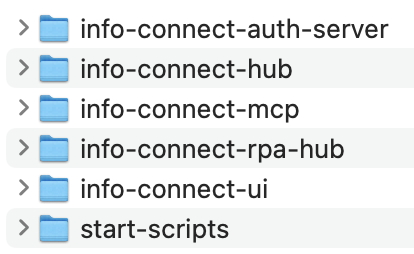
-
(Optional) Review and update the Hub configuration in
<hub home>/info-connect-hub/config/application.properties, including logging, database location, HTTP-port, and authentication settings. Each additional module contains its ownconfigdirectory with module-specific properties files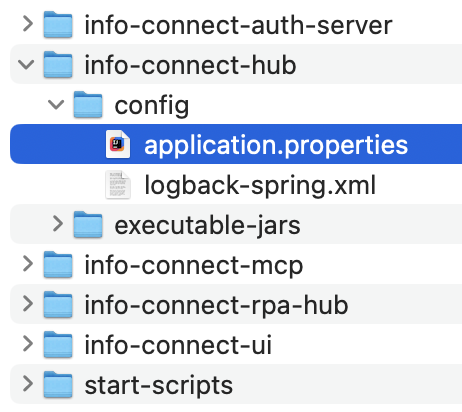
Hub properties You may update the default credentials for the entire Hub distribution by using the credential update script located in
<hub home>/start-scripts.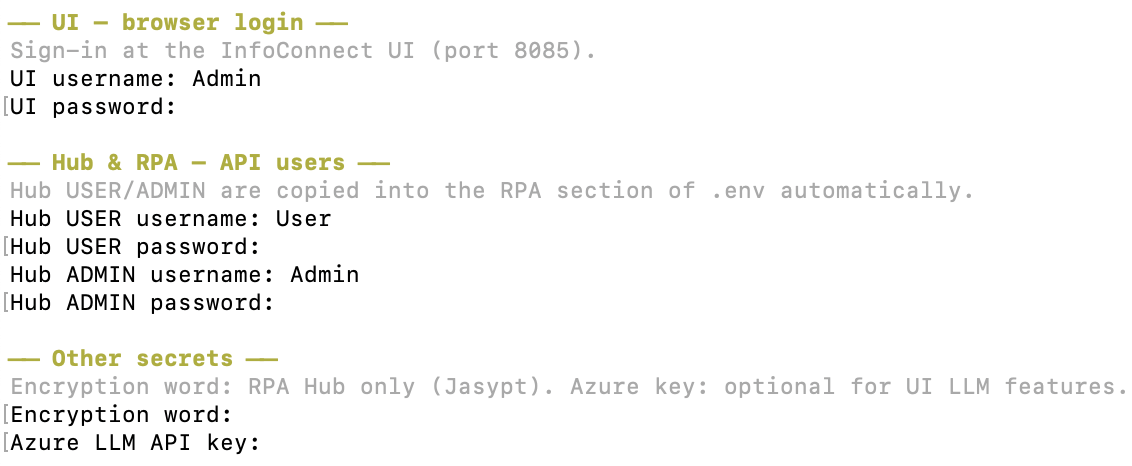
Setting credentials in terminal after running a script - Windows: Run
change-default-creds.batby double-clicking the file. - Linux / macOS / AIX / IBMi: Open a terminal, navigate to the
<hub home>/start-scriptsdirectory, and run:bash change-default-creds.sh
The script will prompt you to enter and confirm the new credentials, then automatically update all Hub components.
- Windows: Run
-
Start the Hub using the startup script located in
<hub home>/start-scripts.- Windows: Run
infoConnectHub.batby double-clicking the file. - Linux / macOS / AIX / IBMi: Open a terminal, navigate to the
<hub home>/start-scriptsdirectory, and run:bash infoConnectHub.shNote: If you haven't provided auth properties - the script for step 3 will start automatically.
- Windows: Run
Once the Hub is running and ports 8080, 8081, and 8082 are accessible, you can start working with IBM i operations through Postman, cURL, or any REST API client.
Note that the stand-alone binary distribution version of the product will work without a valid license for the first 15 min after the instance startup then any config and API attempts will fail due to no license error. Please reach out to the Infoview sales team at sales@infoviewsystems.com or call +1 (734) 293–2160. When launching the product from AWS Marketplace, Azure Marketplace, or other marketplaces supporting metered service subscription, there is no separate license required.
Below is a link to a Postman collection that includes a step-by-step guide for setting up the connection and creating sample program call definitions and DQ Pollers. To use this collection, open Postman and import the collection from the URL below, then set the collection variables to include Hub host, port, IBMi endpoint and credentials, and other variables relevant to each use case.
Hub UI Quick Start Guide
If you prefer a graphical interface, the following UI User Guide describes how to use the Hub web interface.
Product Setup and Operations
Most of the InfoConnect Hub functionality can be configured via admin APIs. However, there are several hardening configuration steps that must be performed directly on the Hub instance. Once the InfoConnect Hub is configured, it will interact with external services and IBM i components via separate Functional API endpoints.
License Management
InfoConnect Hub, when provisioned as a stand-alone component, requires a valid license authorized to access specific IBM i servers. The product will work without any license for the first 15 minutes after the launch. Please contact to Infoview Systems Inc. When launching InfoConnect Hub from AWS Marketplace or other supported marketplaces, no separate license is required.
Contact us for connector pricing info, trial license, or support questions.
The product supports several internal or shared locations to place and maintain the license, including the local file system, AWS S3 bucket, HTTP/HTTPS, FTP, SMB, and Azure blob storage. The license location, necessary credentials, and other attributes are defined as part of Connection configuration via Admin API. Please refer to the API documentation for details. Below is a summary of protocol details required for referencing the license files
| # | Protocol Name | Properties |
|---|---|---|
| 1 | S3 | s3Bucket=path-to-bucket s3Region=us-east-2 s3AccessKey=encrypted-access-key s3SecretKey=encrypted-secret-key |
| 2 | HTTP/HTTPS | httpUrl=http-URL httpDirPath=license-file-path httpUsername=usernamehttpPassword=encrypted-pwd |
| 3 | FTP | ftpHost=ftp-host ftpDirPath=path ftpUsername=username ftpPassword=encrypted-pwd |
| 4 | FILE/SMB | filePath=path-to-license-file |
| 5 | AZURE STORAGE | connectionString=encrypted-connection-string bucketName=bucket-name |
The Program Call and DQ Poller components support JSONata-based transformations for both input and output payloads. For detailed configuration instructions, see the API Reference.
Security Hardening
InfoConnect Hub by default is bundled with pre-defined credentials, HTTP listener, and no IBM i connection.
- The default authentication for Admin APIs is Basic Auth with user ID = Admin and pwd = Password
- The default authentication for Functional API is Basic Auth with user ID = User and pwd = Password@123
You also can change a default authentication system to different OAuth providers using the authentication server. Guide: Setting up OAuth authentication
As part of the product evaluation, likely the most basic security settings and non-secure IBM i connection are created. Below is a security hardening checklist to execute early in the trial / evaluation process:
- Configure HTTPS protocol for the API / HTTP listener
- Configure TLS IBM i connection
- Change the encryption key used to encrypt sensitive properties
- Encrypt all credentials and other sensitive API properties using Admin encryption API
- Change the default Admin and Functional API user ID and password
- Restrict access to APIs to specific allowed source IPs only
- Add rate limiting and other security policies to protect the functional APIs and
How to set up HTTPS
Create our own self-signed SSL certificate
First, we need to create our own self-signed SSL certificate. It is easy to generate the file with java keytool command.
After typing into the terminal command below, you will be asked a couple of questions. This will generate the ssl-server.jks keystore file containing our certificates in the directory from where the keytool command has been executed.
keytool -genkey -alias selfsigned_localhost_sslserver -keyalg RSA -keysize 2048 -validity 700 -keypass changeit -storepass changeit -keystore ssl-server.jks
We can use the command below to view what is inside this keystore.
Spring boot SSL Configuration
Secondly, we need to copy the generated keystore file into the [project-folder]/config folder. Next, we should add the below entries to the application.properties file. Note: [project-folder] is /opt/info-connect-hub for AWS Marketplace Hub instance
server.ssl.key-alias=selfsigned_localhost_sslserver
server.ssl.key-store-password=changeit
server.ssl.key-store=../config/ssl-server.jks
server.ssl.key-store-provider=SUN
server.ssl.key-store-type=JKS
If you want to use keystore password in encrypted form, then paste the encrypted value in ENC() like this:
At the end restart the Hub
How to change the encryption key used to encrypt sensitive properties
Before changing the encryption key, make sure that you don't have active connections, pollers, or encrypted properties configured with a legacy encryption key value.
-
If you run the Hub distribution package using the provided startup scripts (
infoConnectHub.batorinfoConnectHub.sh), no additional configuration is required. The Hub will prompt you to provide an encryption key during startup if one has not been configured yet. -
If you run the Hub distribution package using a Java command, you need to specify your encryption key using the
-Djasypt.encryptor.passwordproperty. -
If you run the Hub from AWS Marketplace, go to
[project-folder]/executable-jarsand update the-Djasypt.encryptor.passwordproperty in theinfo_connect_hub-3.0.0.conffile. Note:[project-folder]is/opt/info-connect-hubfor AWS Marketplace Hub instances. -
Restart the Hub.
How to change the default user ID and password for admin and functional users
Recommended approach
To change the default credentials, use the credential update script located in [project-folder]/start-scripts.
- Windows: Run
change-default-creds.batby double-clicking the file. -
Linux / macOS / AIX / IBMi: Open a terminal, navigate to the
[project-folder]/start-scriptsdirectory, and run:bash change-default-creds.sh
The script will prompt you to enter and confirm the new credentials, then automatically update all Hub components.
Manual configuration
-
Open the
application.propertiesfile located in[project-folder]/config. -
Find the Basic Authentication section.
-
Use the User properties for functional operations and the Admin properties for administrative operations.
-
To change user IDs, update the following properties:
userUsernameadminUsername
- To change passwords, update:
userPasswordadminPassword
- If you want to store passwords in encrypted format:
-
First, encrypt the password using the Admin Encryption API:
POST http://host:8080/admin/encryption -
Then copy the encrypted value and wrap it in
ENC(...). -
Paste the resulting value into the
userPasswordoradminPasswordproperty.
- Restart the Hub.
Cluster Configuration
Admin API definitions
The InfoConnect Hub comes with the following admin APIs that can be used to set up the product, either manually (via CURL / Postman / any other API client) or as part of the CI / CD flow:
- Encryption API – allows encrypting sensitive data like passwords or other secrets
- Connections – manages IBM i connection definitions. It is possible to configure a single InfoConnect Hub instance to connect to multiple back-end systems; however, in most scenarios a dedicated 1 – 1 relationship would work best to ensure the proper segregation of access rules,
- Program Calls – manages program call definitions that will be surfaced for the consumers as REST APIs
- Data Queue Sources – always-on DQ listeners that are registered to receive new DQ messages immediately after they are placed into IBMi DQ and send to the following systems in real time:
- Google (GCP Pub Sub)
- JMS (ActiveMQ, ArtemisMQ, AmazonMQ)
- Azure (ServiceBus, EventHub, EventGrid)
- AWS (SQS, SNS)
- JDBC
- Data Queue Sinks - always-on Messaging or Event platform listeners that and send new data to the IBMi Data Queues in real time:
- Google (GCP Pub Sub)
- JMS (ActiveMQ, ArtemisMQ, AmazonMQ)
- Azure (ServiceBus, EventHub)
- AWS (SQS)
Below is a link to the Admin API documentation
Functional API definitions
The InfoConnect Hub comes with the following functional APIs out of the box:
- Execute Command Call API – does not require any admin / configuration
- Publish Data To Data Queue API or read Data Queue entry directly – does not require any admin / configuration
- Execute Program Call API – requires the program call configuration via Admin API (see above)
- Listen for the new Data Queue entry with DQ Listener (requires the configuration via Admin API) and send to the next systems:
- Google (GCP Pub Sub)
- JMS (ActiveMQ, ArtemisMQ, AmazonMQ)
- Azure (ServiceBus, EventHub, EventGrid)
- AWS (SQS, SNS)
- JDBC
- Execute Screen Automation script
Below is a link to the Admin API documentation
Data Replication with InfoConnect Hub and InfoCDC
Hub Direct Database Replication Support
For use cases where messaging or event infrastructure is part of the data replication architecture, please refer to this example of how to set it up
InfoCDC and InfoConnect Hub Data Replication Guide
AI with InfoConnect Hub
Allows you to create MCP-server based on tools generated from program calls which are stored in the InfoConnectHub system and manage these tools in the runtime