OAuth configuration guide
Set up authorization type in modules
Each module has a list of properties that help will you to configure authorization
1) In Hub or RPA Hub use the property called 'auth.type' and set it to 'oauth'.

2) In MCP use the property called 'mcp.auth.type' and set it to 'oauth'.

Configure communication between modules
When you secure some of your modules with Oauth, you have to set up properties which allow one module to communicate with the other. For example, when you configure Oauth2 security on the RPA module you have to set RPA security properties on Hub. Otherwise, the Hub won't be able to complete requests to RPA.
Hub communicates with RPA Hub, MCP with both Hub and RPA, UI with only Hub. Each of these modules has similar properties for accessing the other modules as shown in the picture below. Here's an example of the properties you must define on Hub:
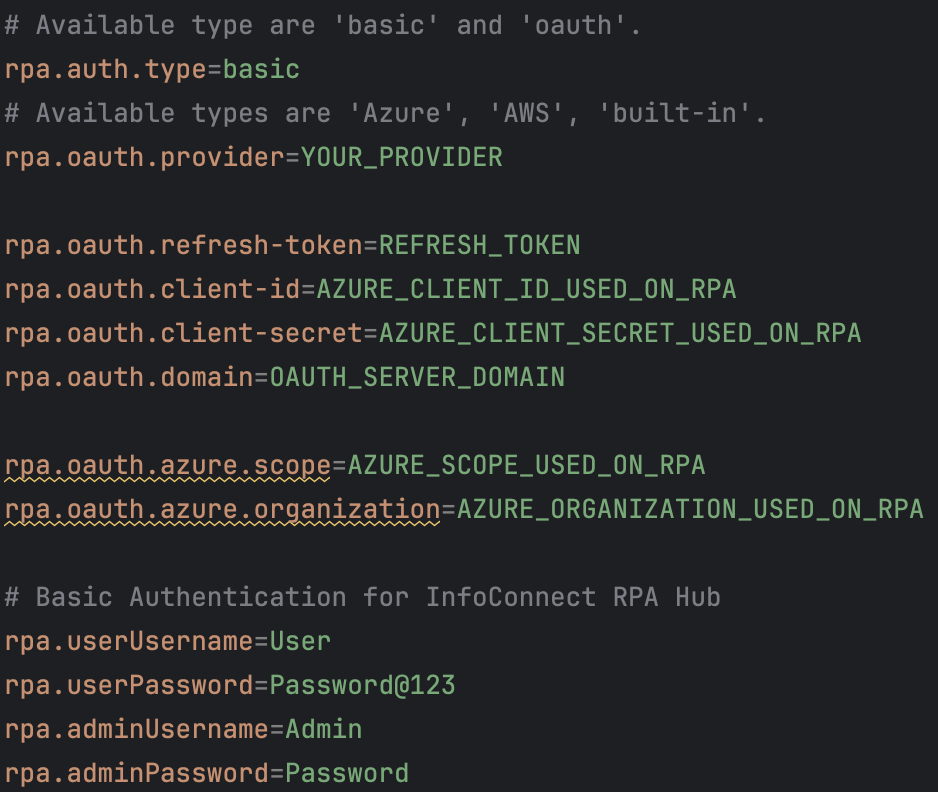
Client secret, client id and domain are common for many Oauth2 providers, these parameters can be found in the settings of your provider.
Refresh token is used by some of the providers. Usually, it stays fresh for a long period of time, the period can be configured in the settings.
Azure scope and Azure organization are only used when you choose Azure provider for your application and can also be found in the settings of Azure.
How to get a refresh token?
It may differ on the provider and described precisely in the documentation of each provider below, but the main steps are:
1) Register on the chosen platform (AWS, Okta, Salesforce)
2) Create users with user roles 'admin', 'user'. (You get different tokens for 'user' or 'admin')
3) Do some special auth-requests you can find in the documentation below, they differ for each provider.
4) You get the refresh token containing information about the authenticated user.
Set up authorization server
You need to chose one of the following OAuth configurations:
- Basic
- AWS
- Okta
- Salesforce
- Azure
- Build-In
Postman Collection Select OAuth InfoConnect Hub folder for setting up authorization
Built-in OAuth authorization:
Steps need to use Build-in OAuth authorization:
1) Run authorization_server application
— In 'application.properties' put your own client secret and client id. ⚠️ These secrets you should use when configuring communication between modules mentioned in the beginning.
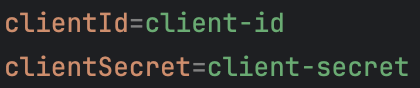
— Change 'basic' to 'oauth' in 'application.properties' at the path '/opt/info-connect-hub/config/' and uncomment the OAuth properties below.

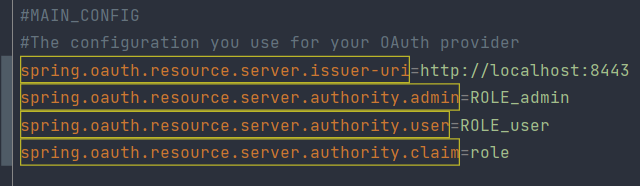
auth.type = oauth
spring.oauth.resource.server.issue-uri=http://localhost:8081/
spring.oauth.resource.server.authority.admin=ROLE_admin
spring.oauth.resource.server.authority.user=ROLE_user
spring.oauth.resource.server.authority.claim=role
⚠️ Issuer-URI is also used as the domain when configuring communication between modules.

— Run the command 'sudo service auth-server start'.
— To enable OAuth autostart, you need to run the command 'sudo chkconfig auth-server on'.
— Now, you need to restart the Hub with the command 'sudo service info-connect-hub restart'.
2) After running the application, you need to open postman OAuth collection for obtain code_verifier for token and code_challenge for generation authorization code –> built-in oauth folder:
- Choose “BUILT_IN:Get code verifier and code challenge” request.

3) Then open postman OAuth collection –> built-in oauth folder:
- Choose “BUILT_IN: Get oauth code” request.
- Copy code_challenge from application console and paste in the same parameter in request.
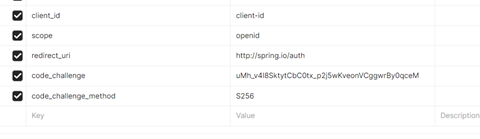
- Copy request and paste in your browser.
- Login by user or admin credentials.
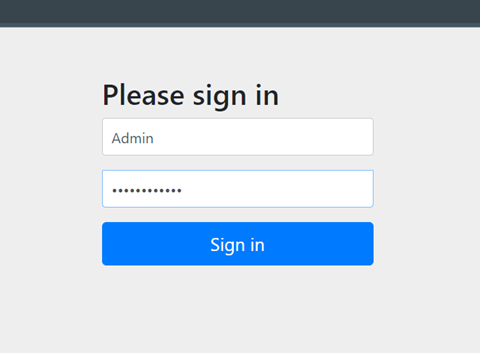
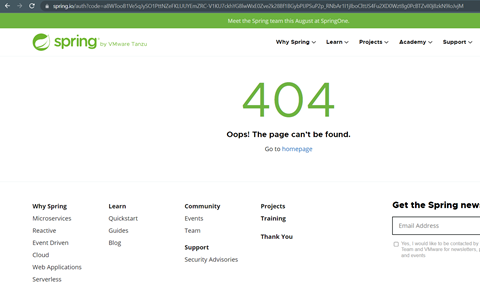
- After signing in you will be redirected to the spring page and find in url parameter code which you need to copy.
- Choose “BUILT_IN: Get oauth token” request.
- Paste code which you already coped in previous step in the same parameter in request, also you need to copy code_verifier from application console and paste in the code_verifier request parameter.
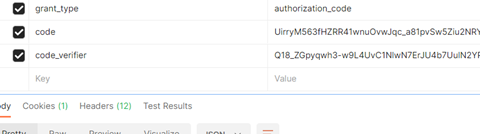
- Send request and get access token. ⚠️ Here you can also get the refresh token which is used when configuring communication between modules.
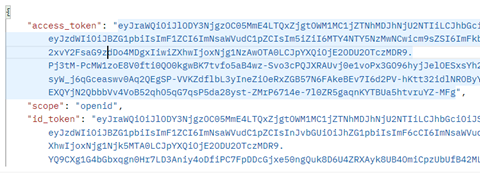
- Using “BUILT_IN: Validate OAuth token” request you could validate the received token.
4) Now you could use access token to get access to different endpoints in info-connect hub
AWS OAuth authorization:
Steps need to use AWS OAuth authorization:
For to configure AWS as an OAuth provider, you need to access the AWS Console and select AWS Cognito.
1) Go to AWS Amazon website
2) In the right-up corner, click "My Account" → "AWS Management Console". You'll be redirected to the login page. Sign in or create your AWS account there
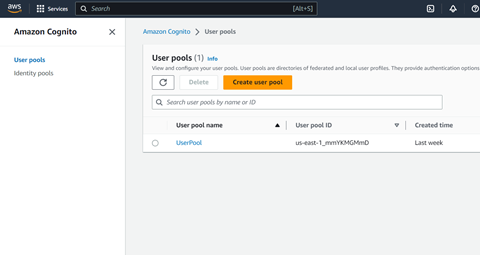
3) Once you sign in, search for "Amazon Cognito" in the search window and click it
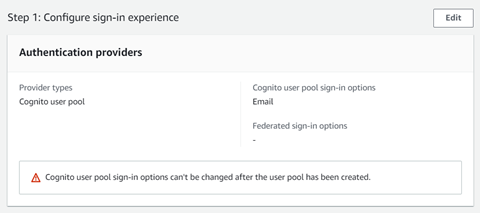
4) You have to create User Pool, click "User Pools" → "Create User Pool"
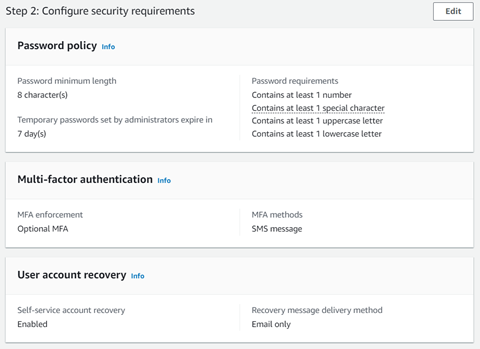
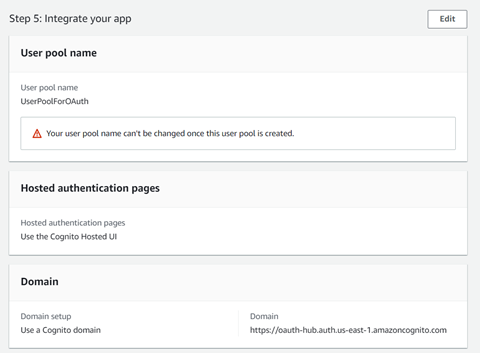
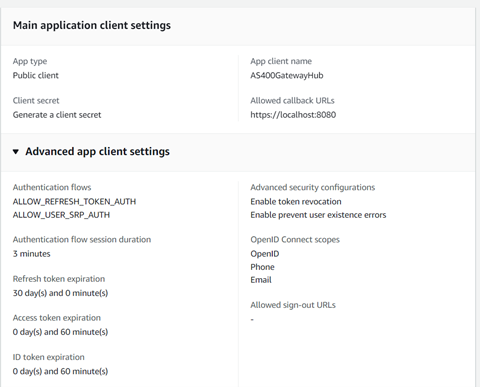
5) Fill in your user pool details. You have to enter the name of your application and redirect uri. Redirect uri is needed for getting access code - you browser will redirect you there on the next steps and give you code
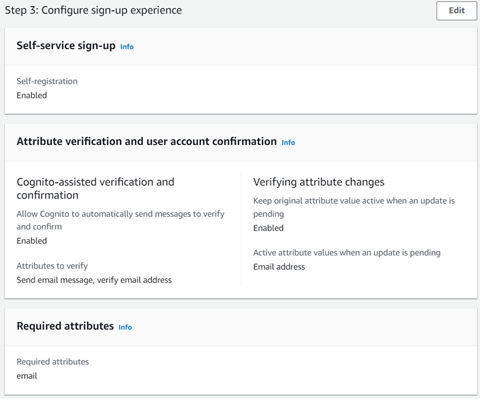
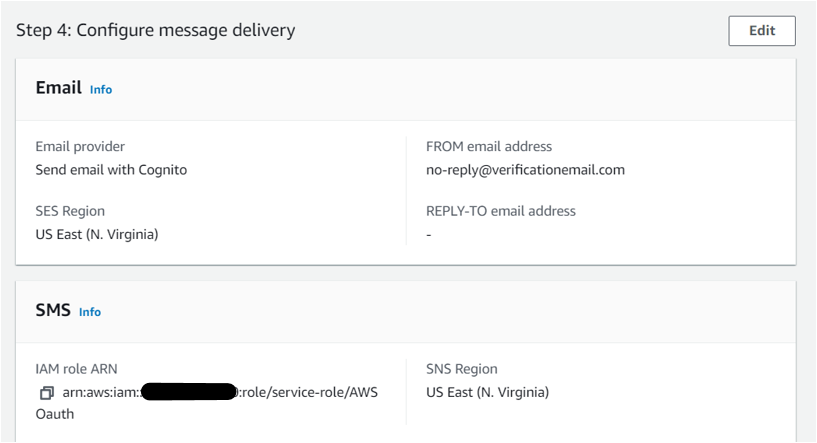
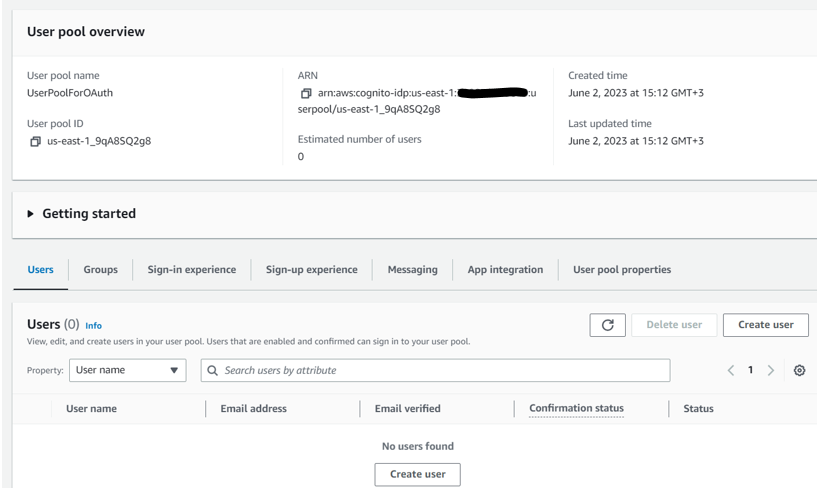
6) After your user pool is created, it will appear in the user pool list. Enter it
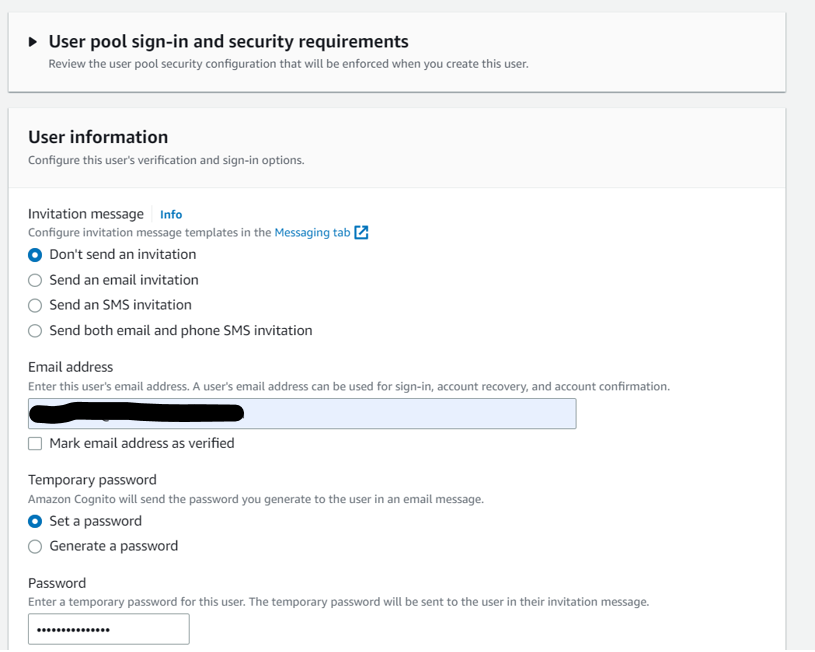
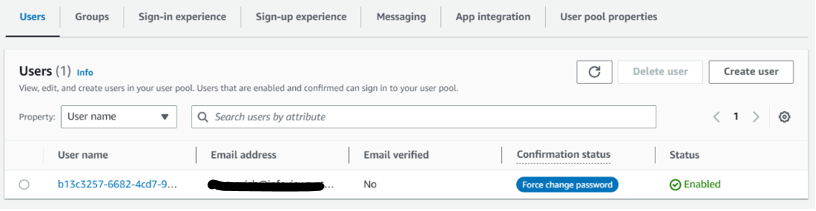
7) Now you need to create a user. Enter the user's tab and press "Create User"
8) Fill in the information about the user. Fill in user mail and user password. Once you create a user, they will be displayed on the "Users" tab within your UserPool.
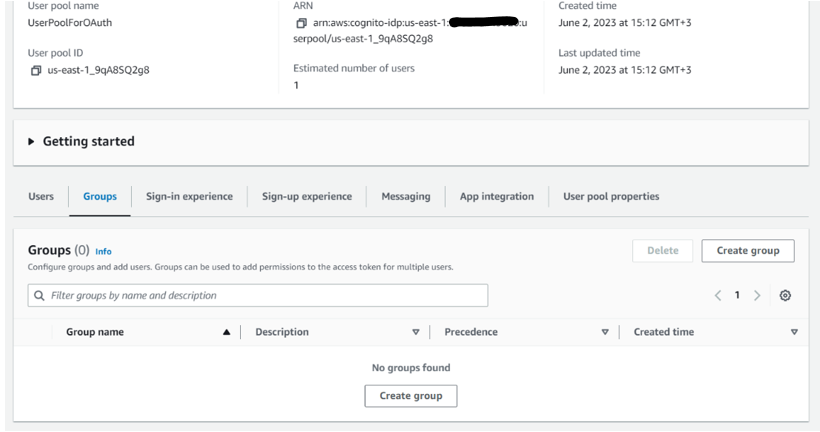
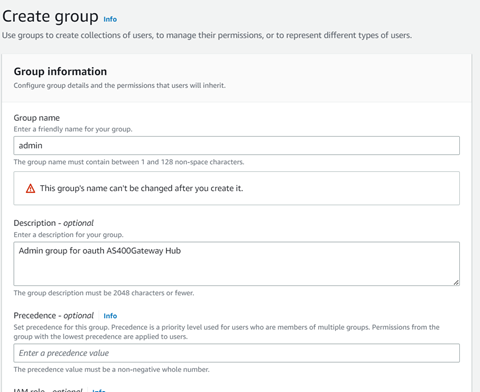
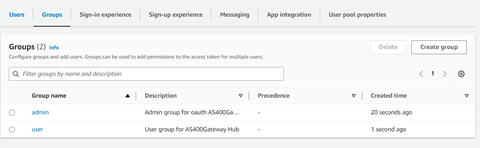
9) Now you need to create the "admin" and "user" groups on the “Groups” tab. Go to the 'Groups' tab and press the "Create Group" button. Fill in the information about each group.

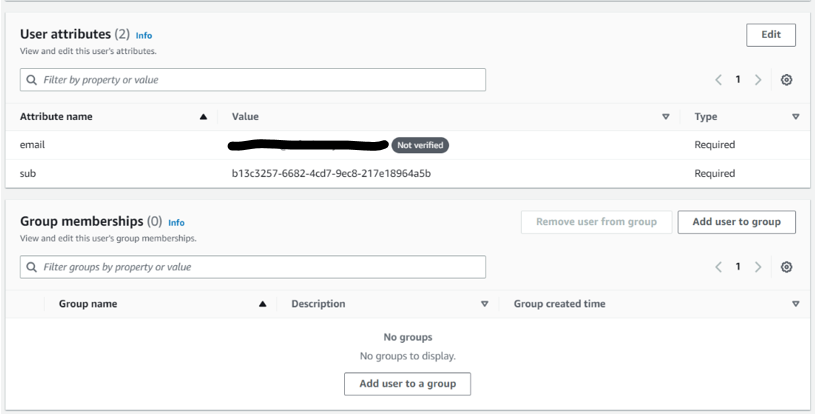
10) After that, you need to return to the "Users" tab again and dive into the newly created user and add user to the admin or user group.
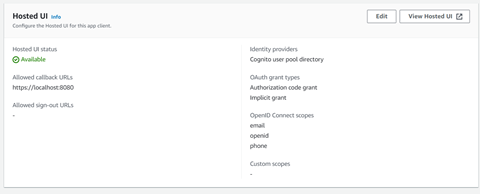
11) You have to receive a token to have access to your application. For getting token, firstly, you should get code. To complete the request for getting a code, go to "App Clients" → "Login Pages" → "View Login Page" and enter the credentials of the created user.
12) Once you sign in your user, you'll be redirected to the uri entered at the beginning. In your browser, in the URL window, you'll find your code next to redirect URI. Copy code
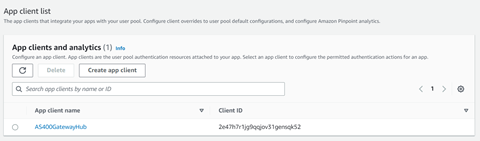
13) Now you have to get a refresh token. You have to know client id, client secret. This information can be found in the "App Clients"
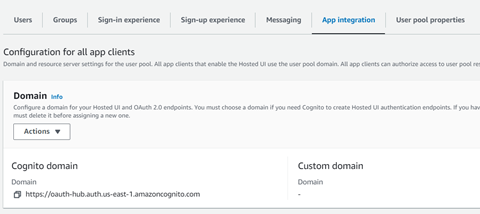
You also have to get domain. In the left panel click "Brand" → "Domain" and copy it from there. You also can edit the domain there

14) ⚠️ Before getting a refresh token, it's better to edit a refresh token lifetime in the user pool settings!
By default, it's 5 days, so your application will be able to work correctly for only 5 days, then you'll have to receive a new refresh token, put it into the properties, and restart the application.
Go to "User pools" → select your user pool → "App clients" → select your app client → "Edit"
In the opened window, you can edit the refresh token lifetime. You can put the longer value you want, for example, one year.
After that, save the changes by clicking "Save changes" in the bottom-right corner.
15) Now you're ready for getting a refresh token.
There are two possible ways of getting it, fill in your values from previous steps in a chosen step. The code you got in the previous step has a short time of life. It can expire really soon, so complete the token-obtaining requests as soon as you get the code:
— Get a token by completing this request in the terminal / console:
curl -X POST \
-H "Content-Type: application/x-www-form-urlencoded" \
-u "YOUR_CLIENT_ID:YOUR_CLIENT_SECRET" \
-d "grant_type=authorization_code" \
-d "code=YOUR_OBTAINED_CODE" \
-d "redirect_uri=YOUR_REDIRECT_URI" \
"YOUR_DOMAIN/oauth2/token"
You will get a response like this:
{
"access_token": "eyJraWQiOiJ....",
"refresh_token": "eyJjdHkiOiJKV1QiLCJhbGciOiJSUzI1NiJ9....",
"id_token": "eyJraWQiOiJ....",
"token_type": "Bearer",
"expires_in": 3600
}
Extract the refresh token from the response and put it into the application properties file.
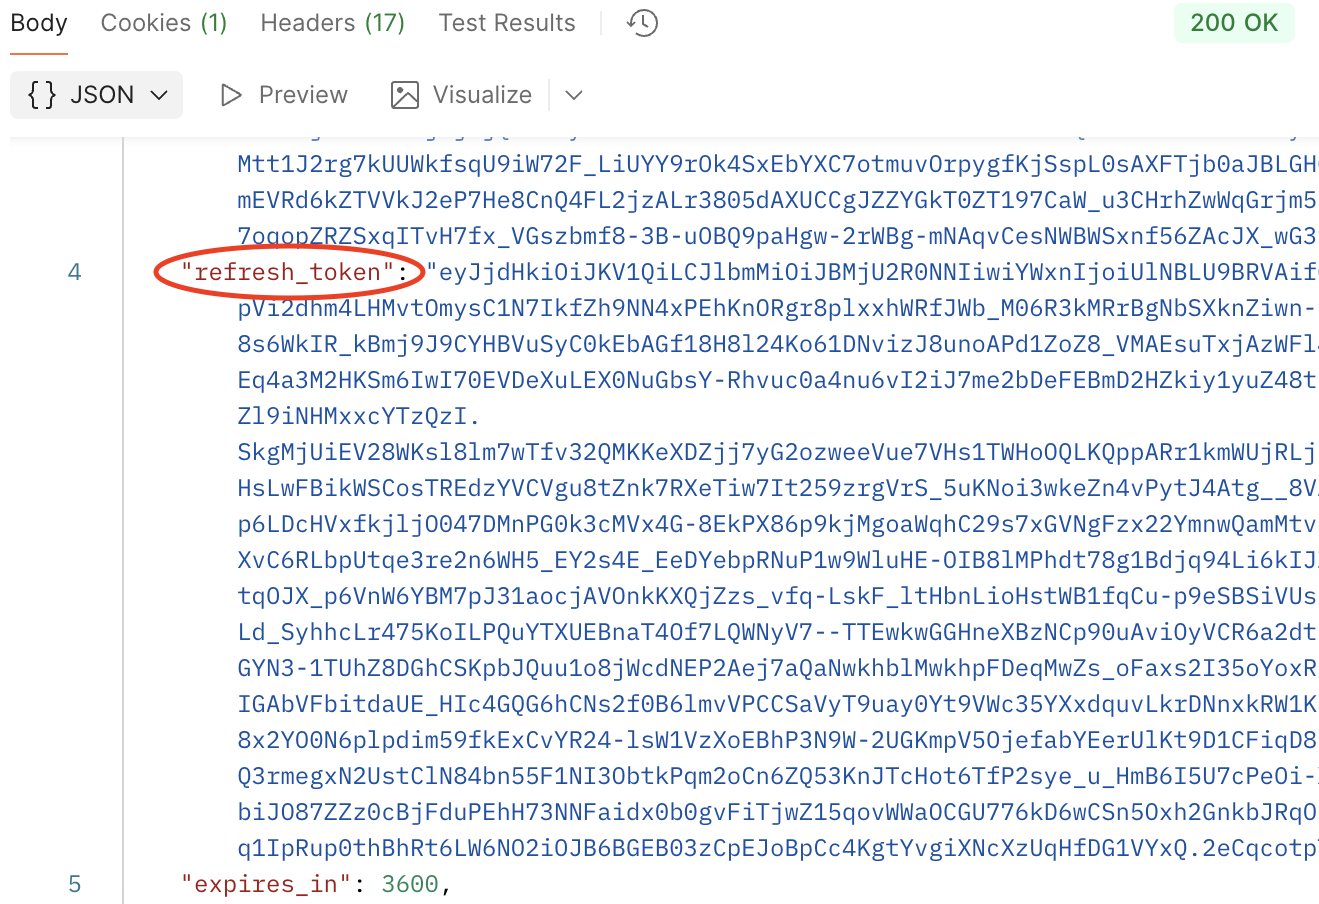
— Get it by Postman:
The response will be the same as the one you can get by request through the terminal. Extract the refresh token and put it into the application properties file.
16) After collecting the information from the token's payload, you need to configure application.properties of info-connect-hub application: collecting the information from the token's payload, you need to configure application.properties of info-connect-hub application:
auth.type = oauth

# ISSUER_URI
# A website, application, or service that creates and signs JWTs.
spring.oauth.resource.server.issuer-uri_OKTA=empty
spring.oauth.resource.server.issuer-uri_BUILT_IN=empty
spring.oauth.resource.server.issuer-uri_AWS=YOUR_ISSUER_URI
spring.oauth.resource.server.issuer-uri_SALESFORCE=empty
spring.oauth.resource.server.issuer-uri_AZURE=empty

# MAIN_CONFIG
# The configuration you use for your OAuth provider.
spring.oauth.resource.server.issuer-uri=YOUR_ISSUER_URI
spring.oauth.resource.server.authority.admin=ROLE_admin
spring.oauth.resource.server.authority.user=ROLE_user
# The parameter that contains information about the user's role when using OAuth.
# Allows extracting user roles from JWT token.
# For AWS use 'cognito:groups', for Azure - 'roles', for BUILT_IN server - 'role'.
spring.oauth.resource.server.authority.claim=cognito:groups
17) To validate the token, you need to use the "AWS: Validate OAuth Token" request. In this request, you should pass the token as a parameter and also add issUrl from token as a parameter.
Okta OAuth authorization
Steps need to use Okta OAuth authorization:
1) You need to go to "Applications" and select the "Applications" option from the menu.
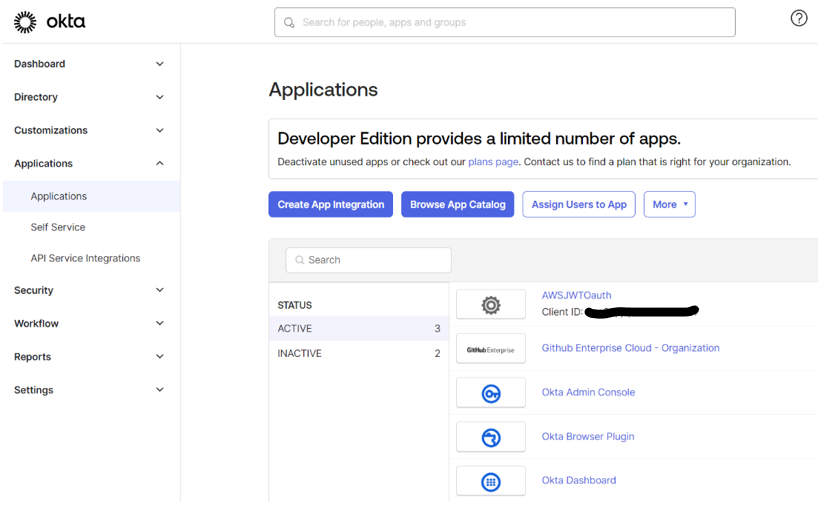
2) Click Create App Integration. 3) Choose OIDC OpenID Connect and Web Application
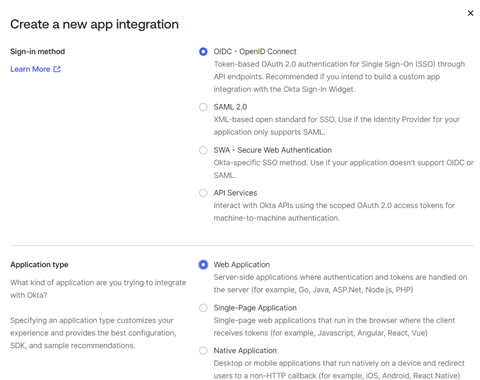
4) Create application
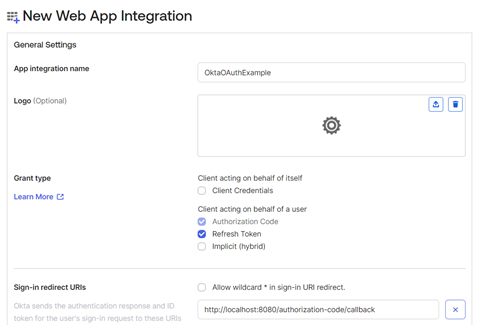
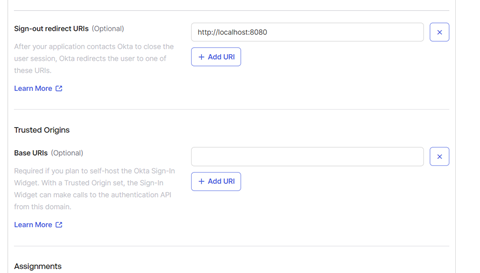
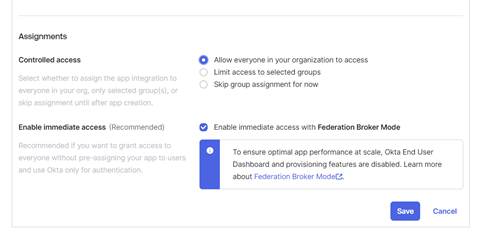
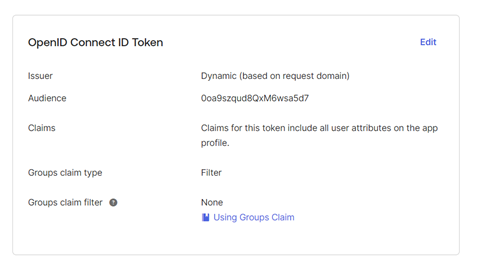
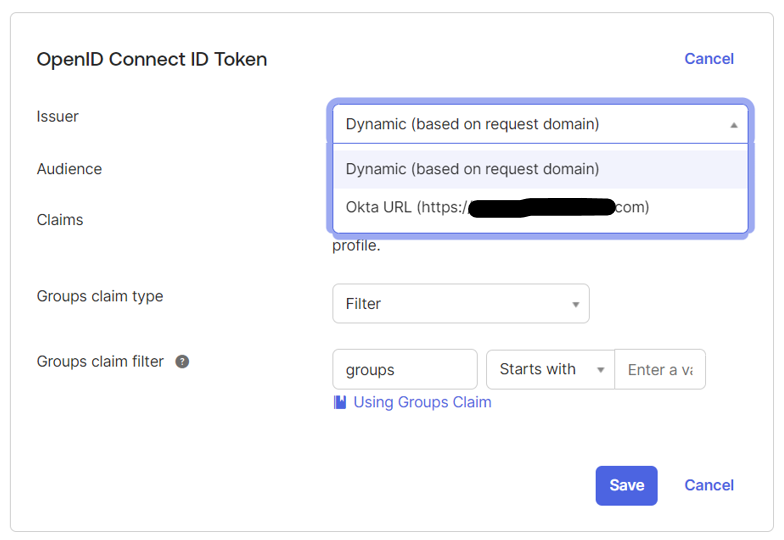
5) Now you need to go to Sign On tab and find OpenID Connect ID token. Then Edit -> Issuer -> Select Okta URL -> Save.
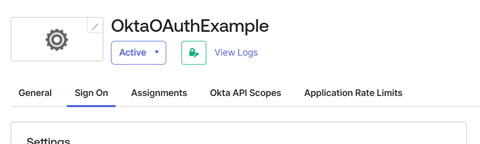
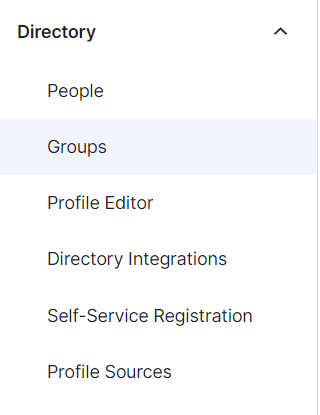
6) Now you need to go to the "Directory" tab and select "Groups" from there.
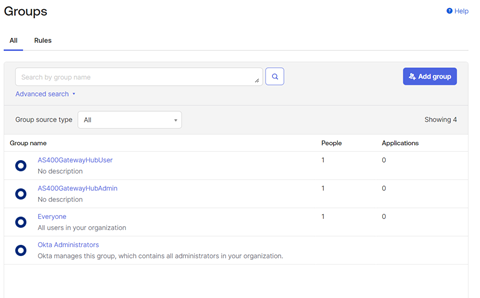
7) Click Add group and set up new group for admin and user.
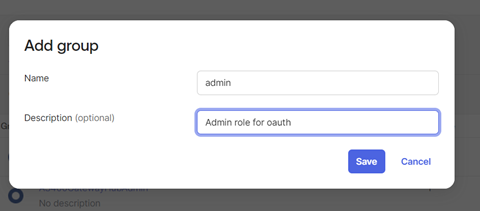
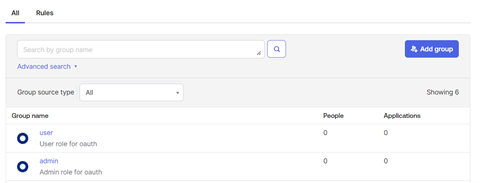
8) Now we need to add the user to a specific group.
-
Go to a group in which you need to assign someone
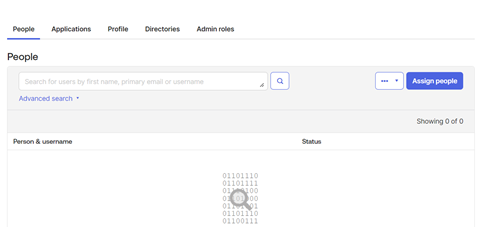
-
Click assign people and then choose user and click plus button
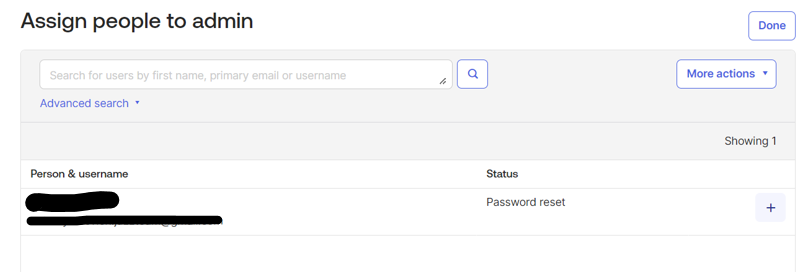
-
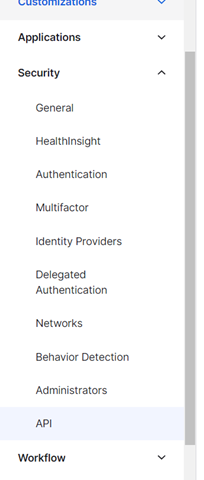
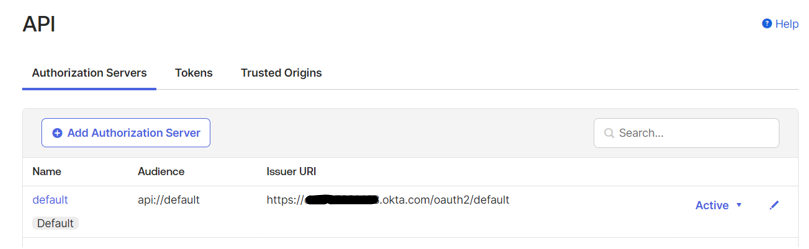
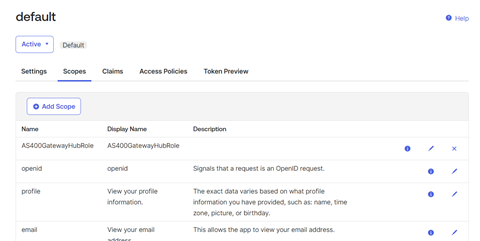
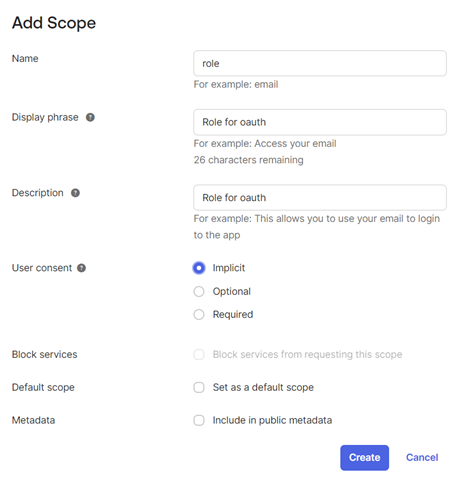
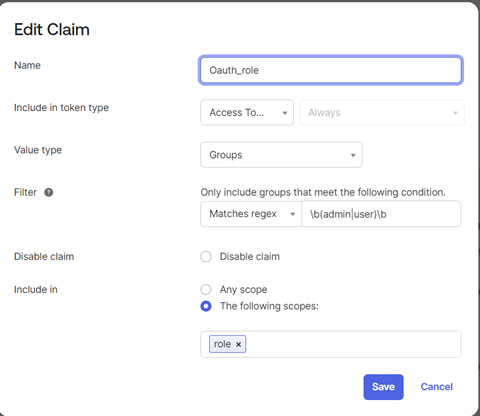
Add a scope, which we'll name "role", where we'll later place the claims containing information about the user's group/role
-
Go to "Scopes" tab and click Add Scope and set up scope
-
Click Add Scope and set up scope
-
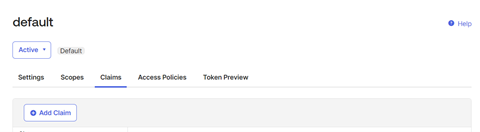
Go to "Claims" tab and click Add Claim
-
Set up the requirement:
- name: name
- filter: Match regex (admin | user)
- Include in: scope form previous steps
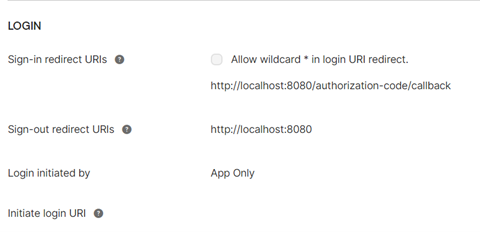
9) Now, all that remains is to update the requests in the "Okta" folder of the Postman collection. Select the "Okta: Get OAuth Code" request, copy the "Sign-in redirect URIs", and paste it into the "redirect_uri". Parameter of the request. Copy the "client_id" and paste it into the "client_id" parameter of the request.
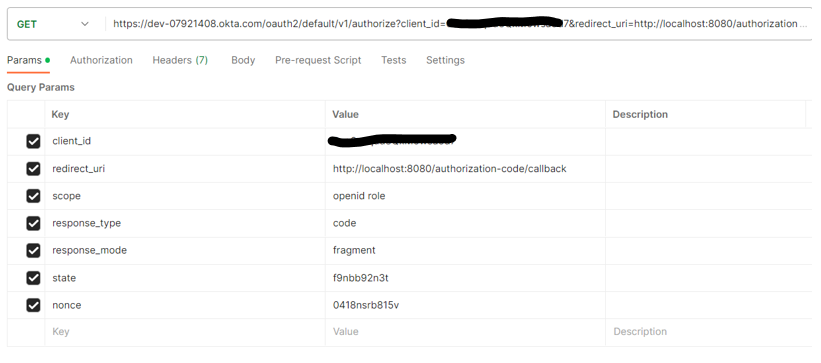
10) Copy the request and paste it into your browser, after which you will be redirected. From the search bar, copy the "code" parameter.

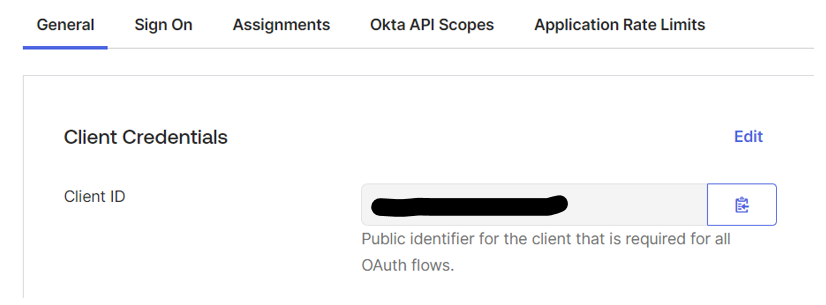
11) Paste the copied code into the "code" parameter of the "OKTA: Get OAuth Token" request. * redirect_uri : The "Sign-in redirect URIs" that was copied in the previous step * client_id : You could find in "General" tab * client_secret : You could find in "General" tab
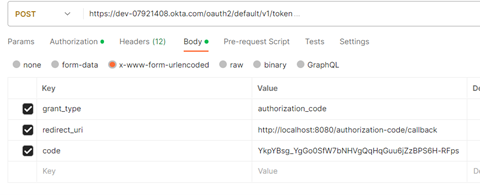
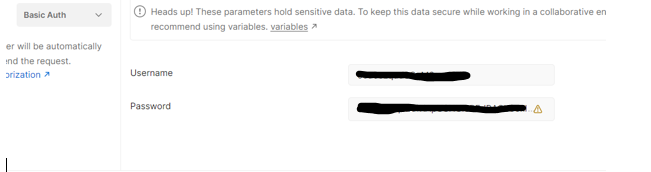
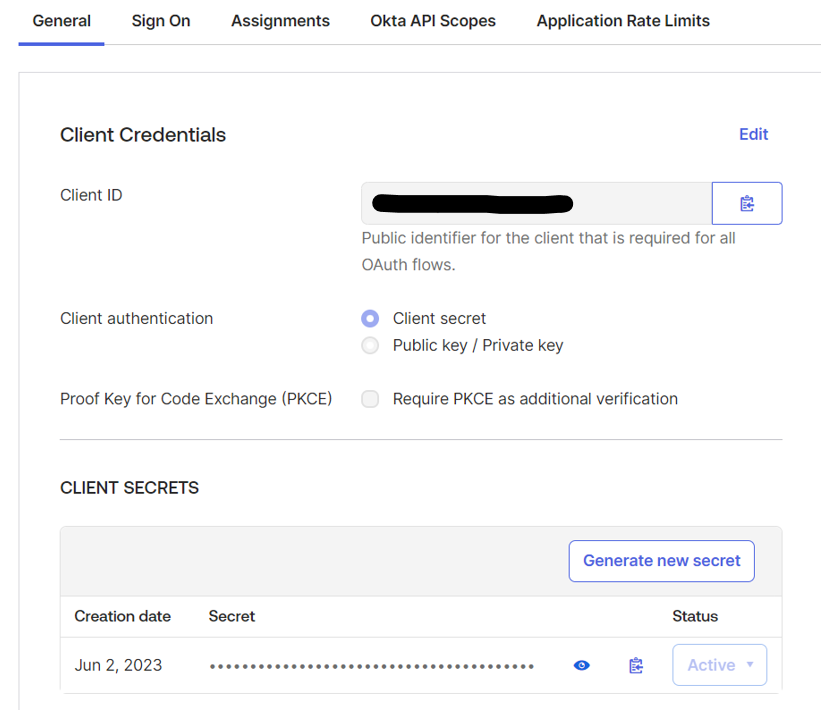
12) Now you need to decode your token using https://jwt.io/
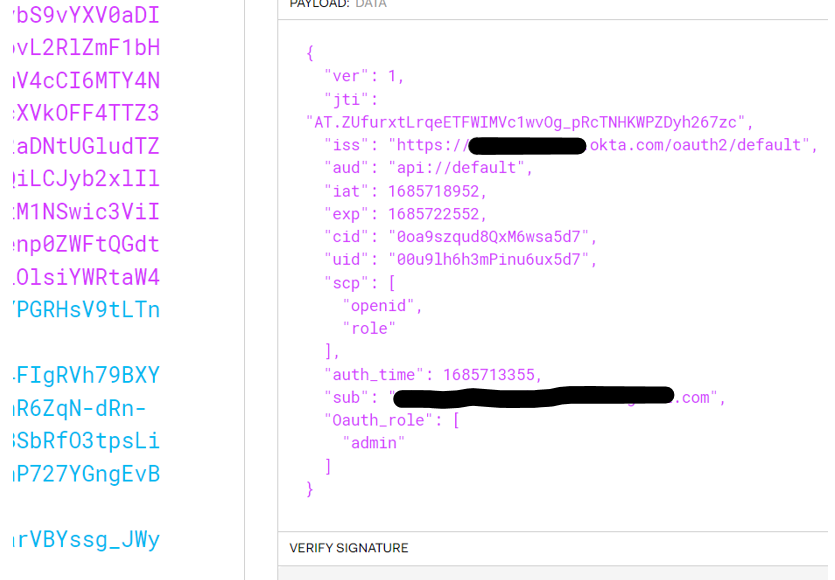
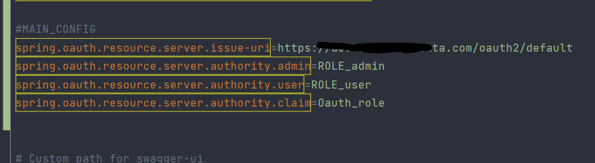
13) After obtaining the information from the token's payload you need to configure application.properties of info-connect-hub application:
```properties
auth.type = oauth
spring.oauth.resource.server.issue-uri = {iss}
spring.oauth.resource.server.issue-uri_OKTA = {iss}
spring.oauth.resource.server.authority.claim_AWS = {name} // name of the attribute that contains the information about the user's group or role
spring.oauth.resource.server.authority.claim = {name} // name of the attribute that contains the information about the user's group or role
spring.oauth.resource.server.authority.admin = {ROLE_user} // Should correspond to the names of your groups in OKTA
spring.oauth.resource.server.authority.user = {ROLE_user} // Should correspond to the names of your groups in OKTA
```
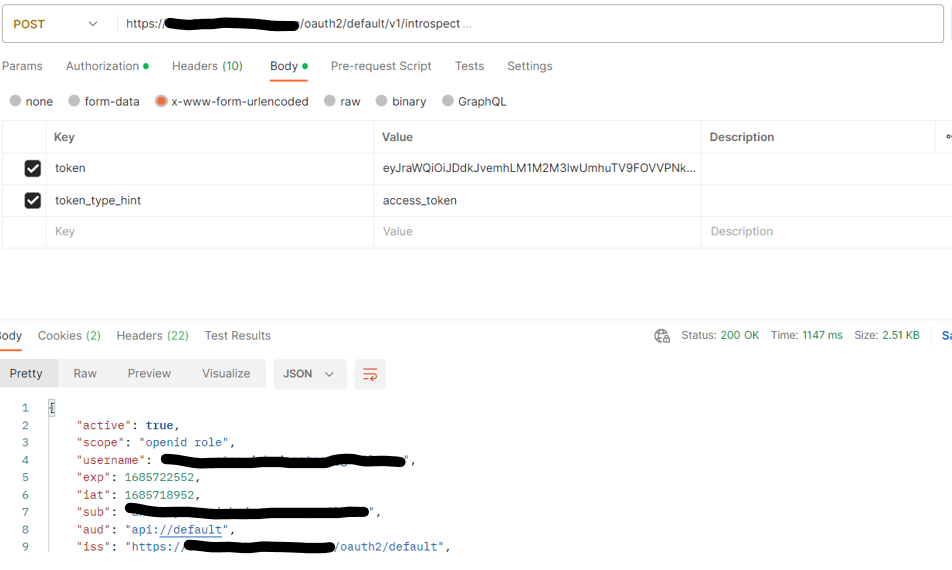
14) You could use “OKTA: Validate oauth token” with token in body parameter for validate token
Salesforce OAuth authorization
Steps need to use Salesforce OAuth authorization:
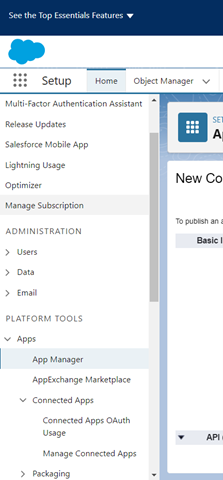
1) After logging into Salesforce, you need to click on the gear icon next to your profile (called Setup).
2) After that, go to the App tab under the Platform Tools category, and select App Manager
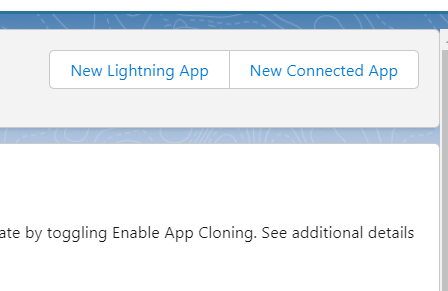
3) Click on "New Connected App."
4) Now you need to configure the Connected app, for example, as shown here: * Enable OAuth Settings: true * Selected OAuth Scopes: Access unique user identifiers (openid) * Include custom attributes * Include custom permissions
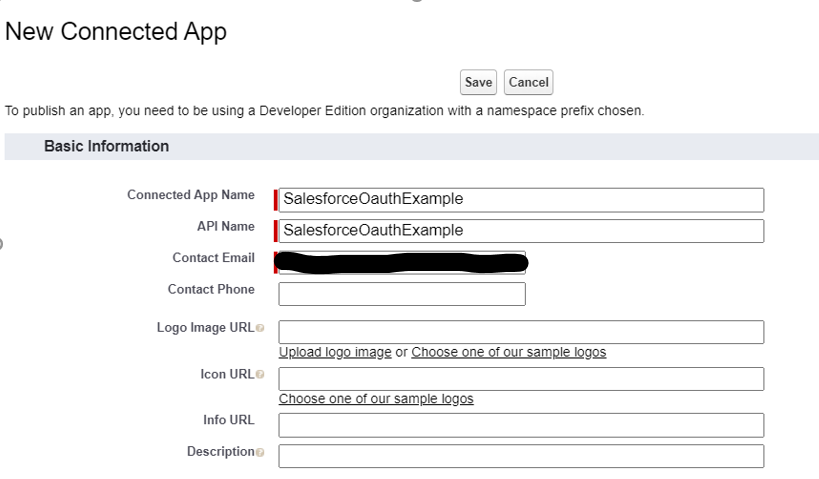
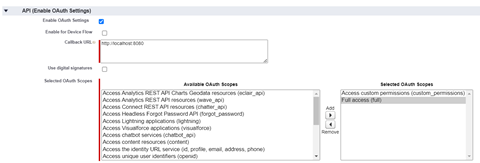
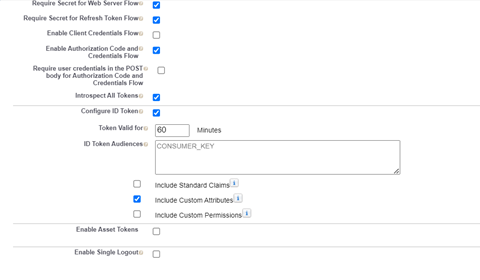
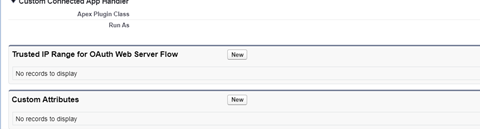
5) Now scroll down the page of the newly created Connected App and create a new Custom Attribute.
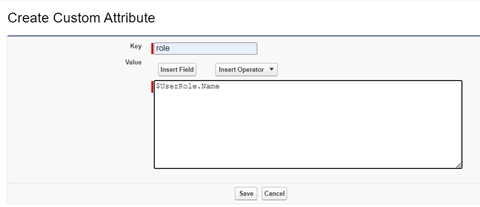
6) Create an attribute that will be based on the user's role (We will create it in the next step).
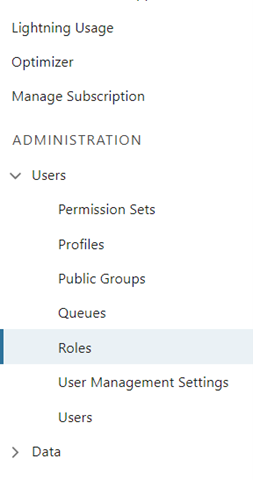
7) To create a user role, you need to navigate to the Administration directory and select Users -> Roles -> Add Role.
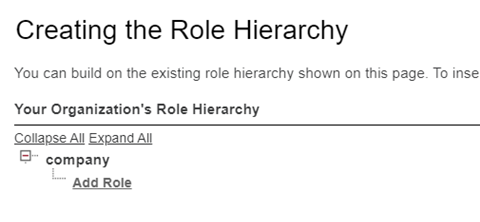
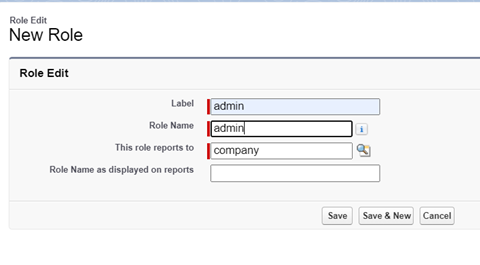
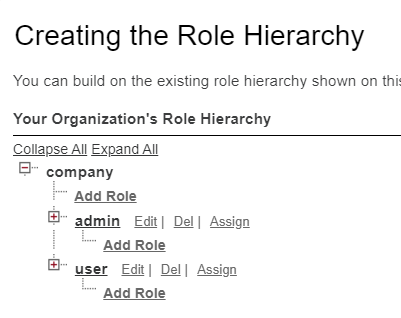
8) To add a role to a specific user:
- Click on the role to which you want to assign the user.
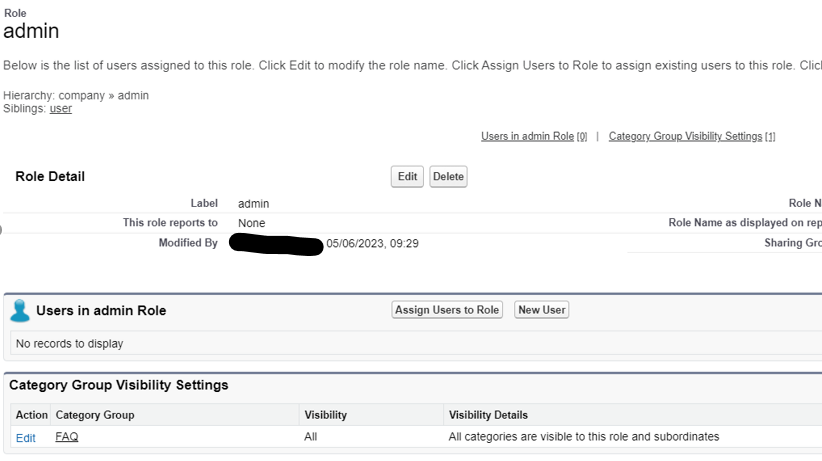
- Then click on "Assign Users to Role"
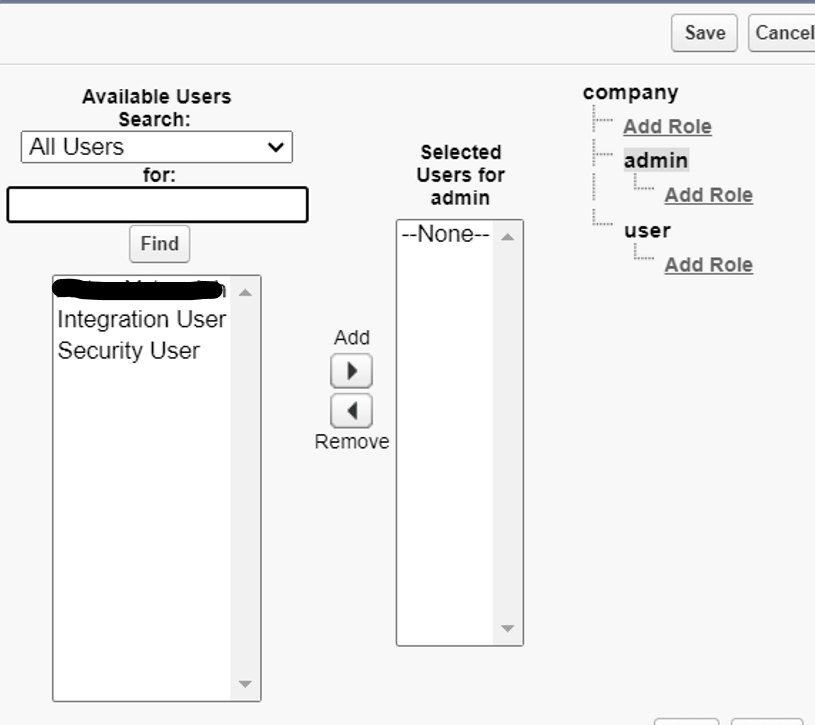
- In the dropdown menu labeled "Available Users Search," select "All Users."
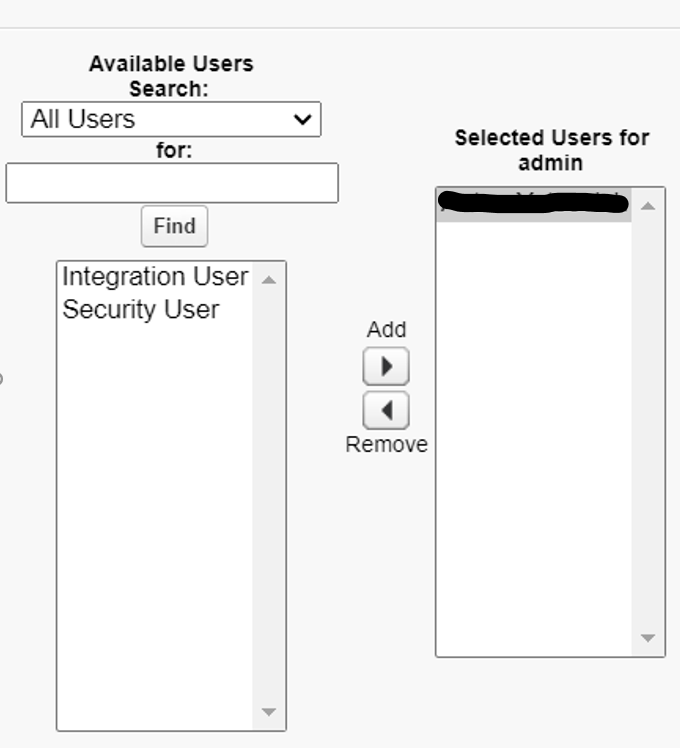
- And select the user to whom you want to assign the role.

9) Go back to the created application and select "Manage Consumer Details" to obtain the client_id and client_secret.
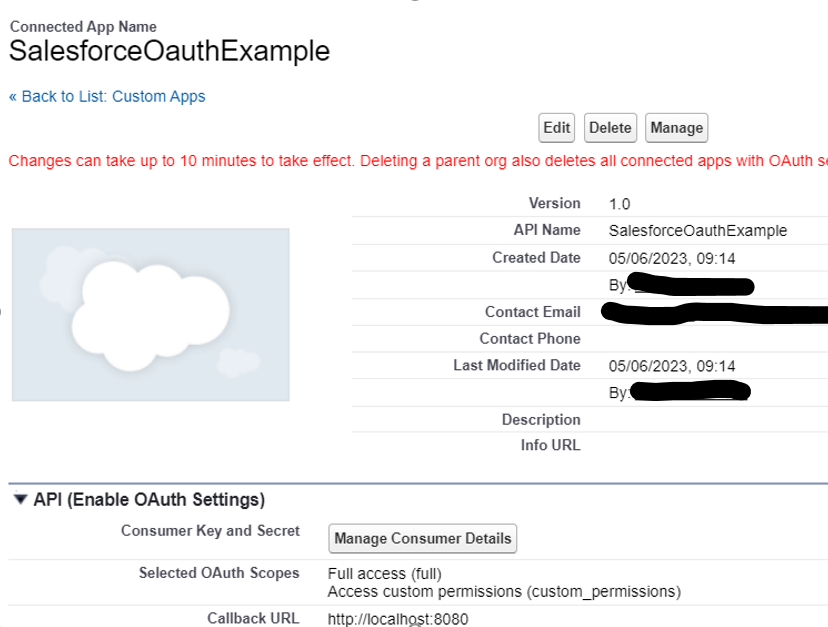

10) Copy the client_id and client_secret and paste them into the respective fields in the SALESFORCE: Get OAuth Token step in the OAuth collection posts. Also, add the callback URL that you created during the configuration of the Connected App.

11) After generating the token, you will receive an Access token and an ID token. We will need the ID token for further work, as the Access token is not in JWT format. To decode the token, you can use https://jwt.io/.
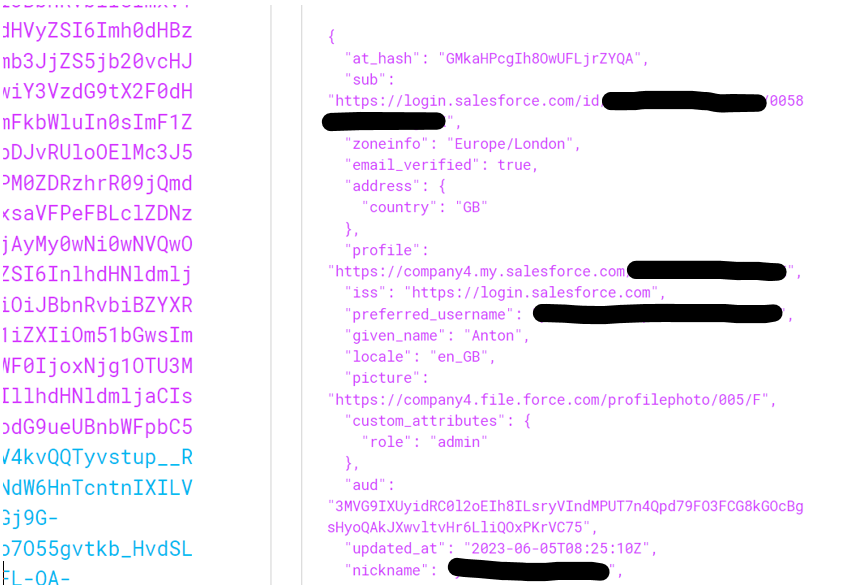
12) After obtaining the information from the token's payload you need to configure application.properties of info-connect-hub application:
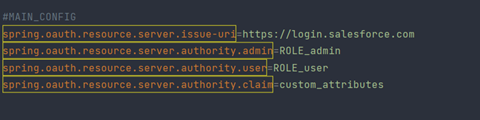
```properties
auth.type = oauth
spring.oauth.resource.server.issue-uri = {iss}
spring.oauth.resource.server.issue-uri_SALESFORCE = {iss}
spring.oauth.resource.server.authority.claim_SALESFORCE = {name} // name of the parameter from which you want to retrieve the role/group information
spring.oauth.resource.server.authority.claim = {name} // name of the parameter from which you want to retrieve the role/group information
spring.oauth.resource.server.authority.admin = {ROLE_user} // Should correspond to the names of your groups in SALESFORCE
spring.oauth.resource.server.authority.user = {ROLE_user} // Should correspond to the names of your groups in SALESFORCE
```
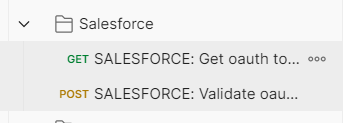
13) To validate the token, you need to use the SALESFORCE: Validate OAuth Token request, to which you should pass your token, client_id, and client_secret as parameters.
Azure AD OAuth authorization
Steps need to use Azure OAuth authorization:
1) First, you need to log in to Azure Active Directory.
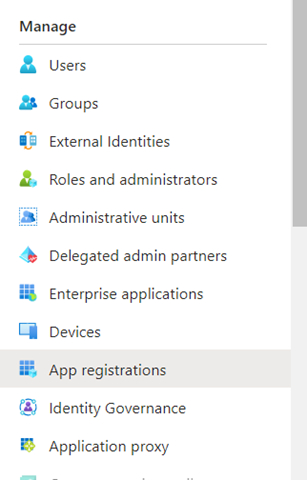
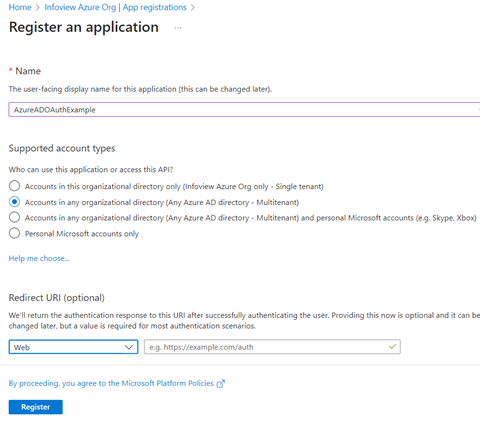
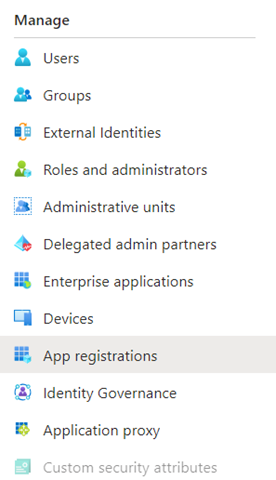
2) In the Manage category, select "App registrations" -> "New registration".
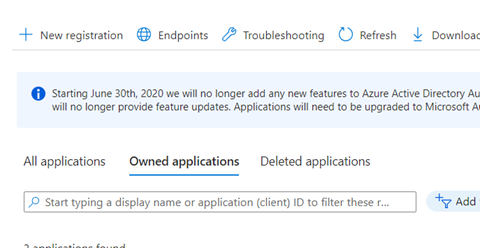
3) You could use configuration: * Supported account type: Account in any organizational directory (Any Azure AD directory - Multitenant)
4) Then set the Application ID URI:
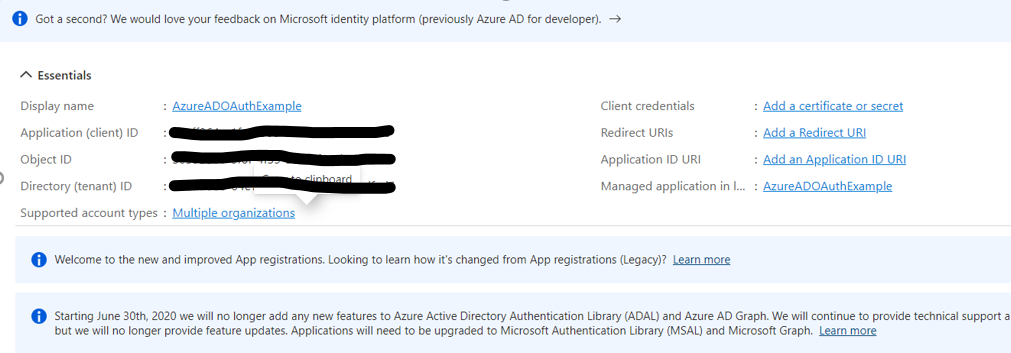
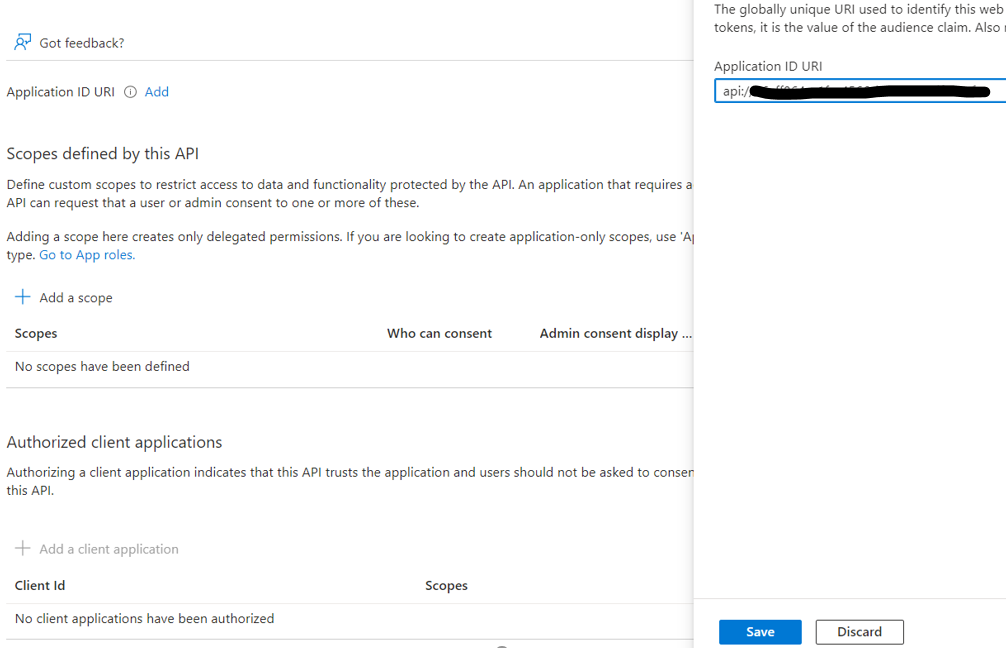
- Click "Add" button next to "Application ID URI", and in the pop-up window, click "Save"
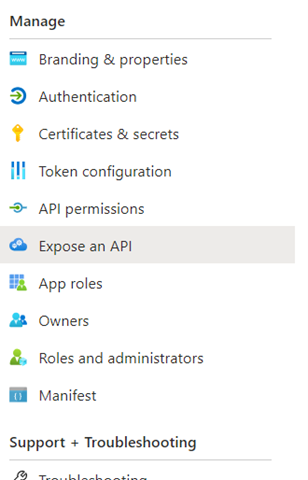
5) Now you need to switch to the "App roles" tab in the "Manage" directory
6) Click on "Create app role"
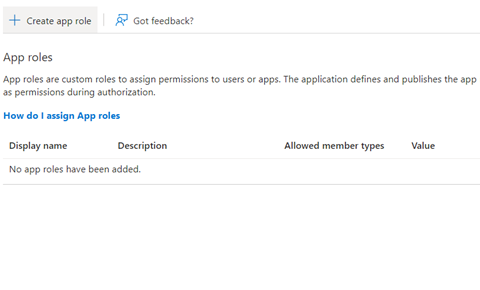
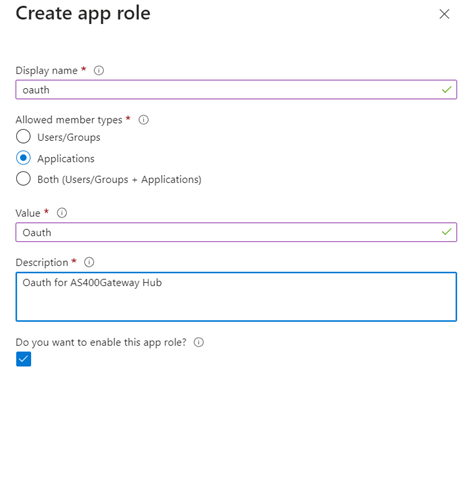
7) Then create role (you need to create roles for admin and user):
- Name: admin/user
- Allowed member type: Applications
- Value: admin/user
- Do you want to enable this app role?: true
8) Now we need to create a client for this application. Go to “App registrations” tab.
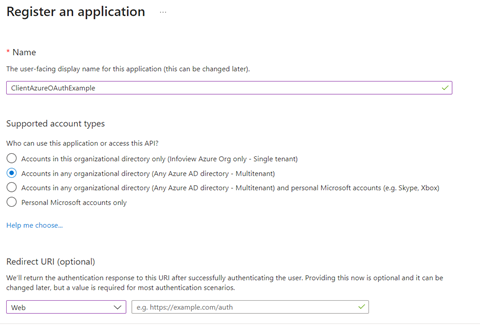
9) Create new application (for 2 roles you need to create 2 client applications for admin and user role):
- Name: YOUR_NAME
- Supported account type: Account in any organizational directory (Any Azure AD directory - Multitenant)
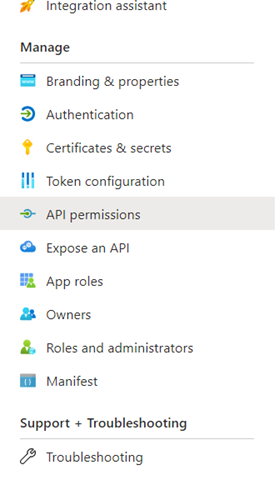
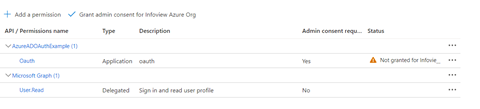
10) Now we need to add API permissions. Go to “Api permissions” tab -> "Add permission".
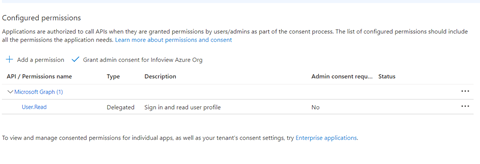
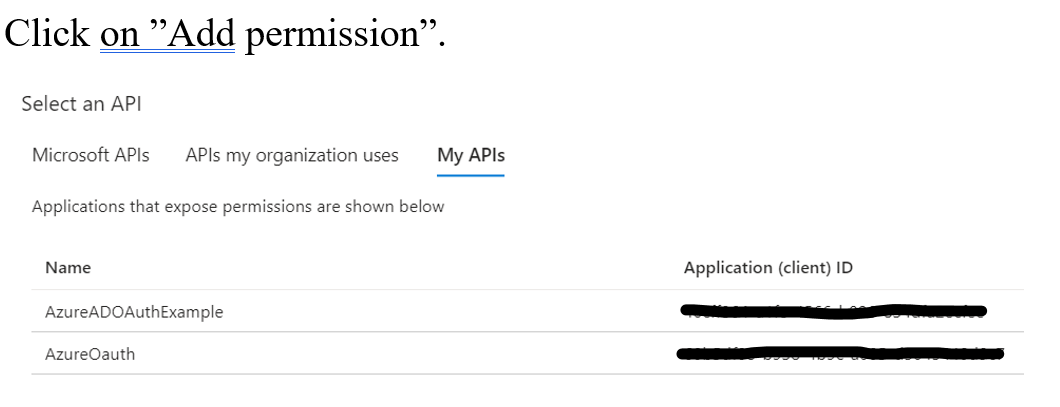
11) Choose My APIs and select your application created in the previous step (8). After that, you need to grant admin consent for
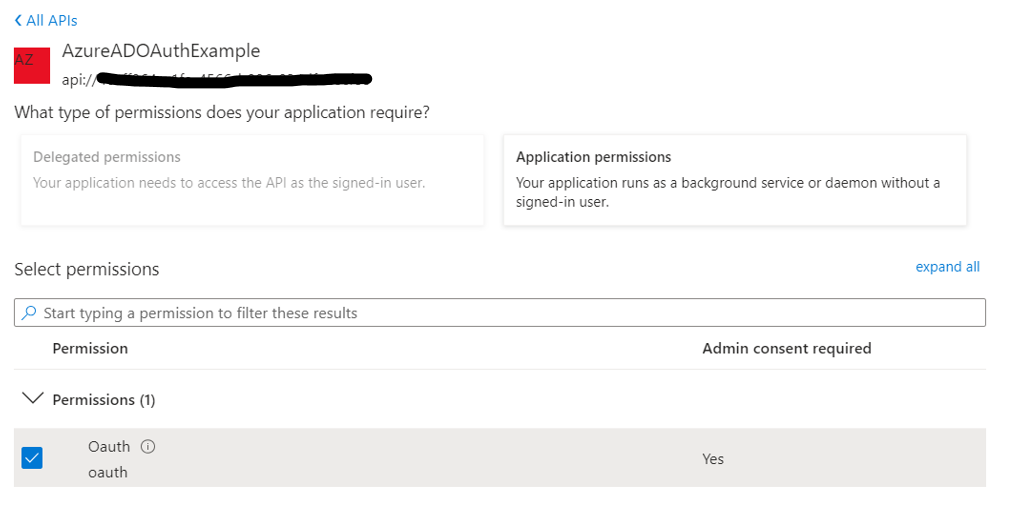
12) Now you need to configure the client_id and client_secret. To do this:
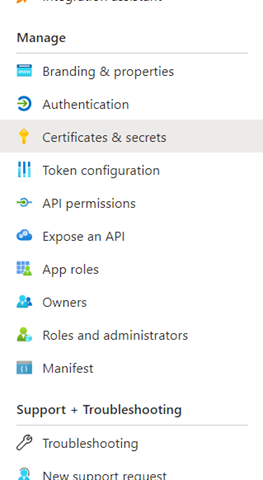
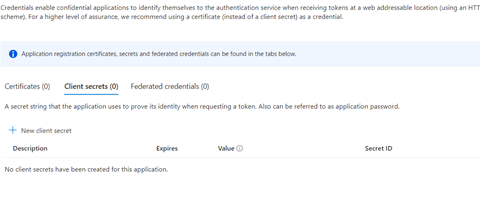
- Go to the "Certificates and secrets" tab -> "New client secret".
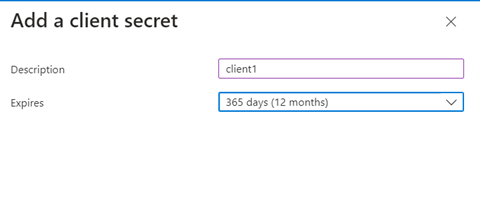
- Now you need to copy client_secret from Value field and paste in client_secret parameter in “AZUREAD: Get oauth token” request.
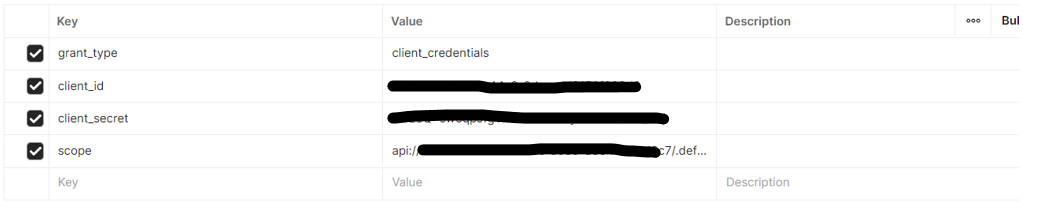
- Also copy Application ID and paste in client_id parameter in request.
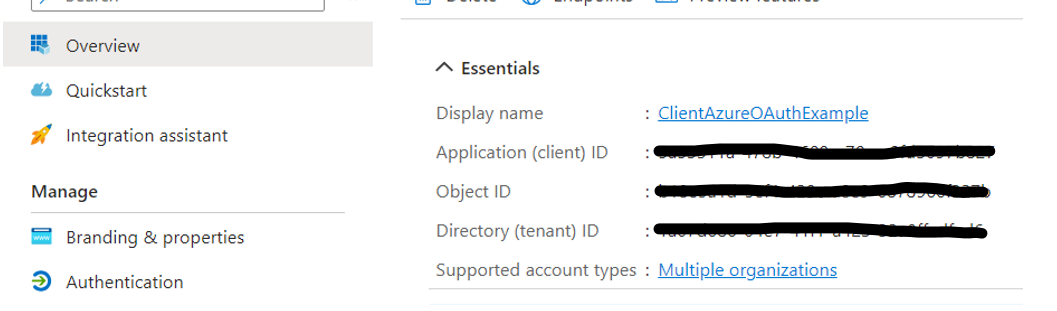
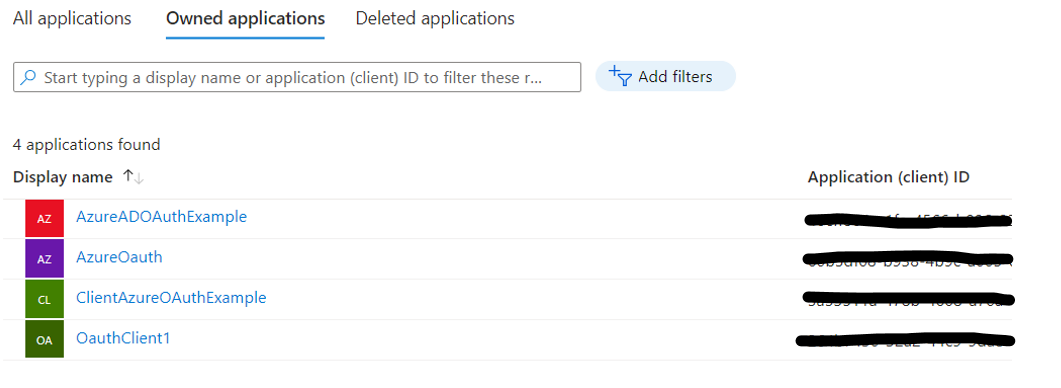
- Now go to All apps by click on
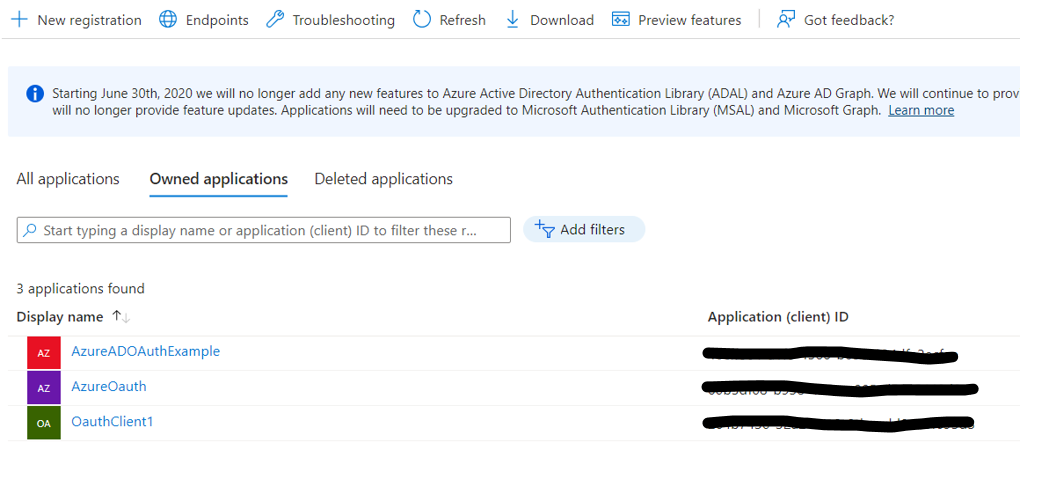
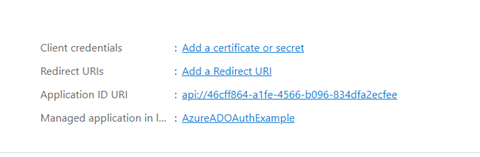
- Choose app created first. In my case AzureADOauthExample and copy Application ID URI. Before you paste parameter in the request add "/.default" to this URI. For example: api://46cff864-a1fe-4566-b096-834dfa2ecfee/.default
13) Go to All applications, choose your client application -> "Endpoints"
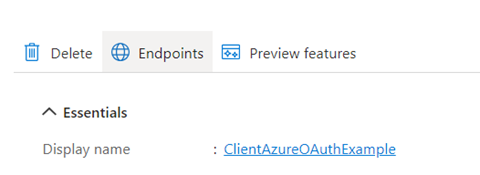
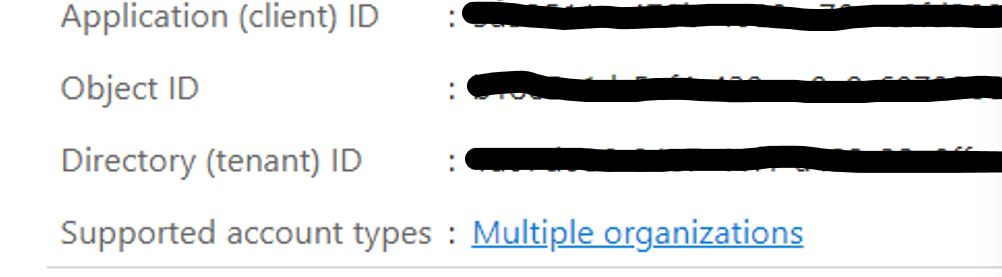
14) Copy OAuth 2.0 token endpoint (v2) request and paste in AZUREAD: Get oauth token request field. Replace "organizations" with the value of the Directory ID.



15) Now you have obtained an Access token that can be decoded using https://jwt.io/.
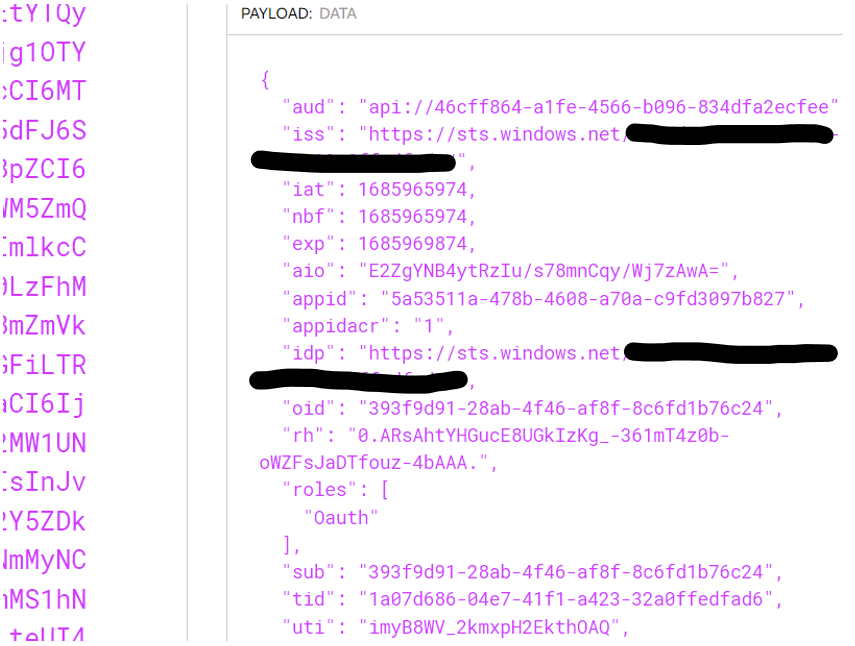
16) After obtaining the information from the token's payload you need to configure application.properties of info-connect-hub application:
auth.type = oauth
spring.oauth.resource.server.issue-uri = {iss}
spring.oauth.resource.server.issue-uri_AZURE = {iss}
spring.oauth.resource.server.authority.claim_AZURE = "roles" // name of the parameter from which you want to retrieve the role/group information
spring.oauth.resource.server.authority.claim = "roles" // name of the parameter from which you want to retrieve the role/group information
spring.oauth.resource.server.authority.admin = {ROLE_user} // Should correspond to the names of your groups in AZURE
spring.oauth.resource.server.authority.user = {ROLE_user} // Should correspond to the names of your groups in AZURE

17) Azure does not currently provide a validation endpoint, but as they mentioned on their forums, they are actively working on it.