Configuring AI Agent Ecosystem with MCP and Cursor
Overview
This guide describes how to install, configure, and connect the AI Agent ecosystem powered by the MCP Server, Cursor, and Slack through n8n workflows.
MCP (Model Context Protocol) is a middleware technology that defines a structured, standardized way for AI systems to communicate with external tools, APIs, and enterprise data sources. It acts as a bridge between the language model and business systems (e.g., Salesforce, AS/400), ensuring that the AI Agent can execute real actions, retrieve live information, and maintain data consistency across environments.
When a user sends a message in chat, the AI Agent interprets the intent and MCP translates that intent into structured tool calls. The tools themselves are the executable capabilities such as retrieving order data, updating a customer record, or running a process in AS/400 — the “hands” of the AI Agent.
The results are then returned through MCP back into the chat (e.g. Cursor built-in chat), where the AI formats and presents them as a natural-language response.
By following this document, you will:
-
Deploy and authenticate the MCP Server.
-
Integrate it with Cursor AI for local intelligent assistance.
-
Set up Slack communication via n8n automation.
-
Optionally extend the AI Agent’s knowledge using a RAG (Retrieval-Augmented Generation) subsystem.
Quickstart
-
Run InfoConnectHub.sh which will start the application
-
Create ProgramCall/RPACall
-
Open your AI Agent with MCP support (Cursor, Claude, etc.)
-
Go to MCP settings
-
Add custom MCP server by pasting the configuration from below
{ "mcpServers": { "InfoConnect-AI": { "type": "streamable-http", "url": "http://localhost:8083/api/mcp" } } } -
Wait until MCP server pulls created ProgramCalls/RPACalls
-
Plug the system prompt (example) and start asking
Cursor and MCP installation steps:
-
Download Cursor AI agent
-
Run InfoConnectHub.sh file which will start the application
-
Complete GET http://localhost:8083/auth, and you will receive a Bearer token for authentication
-
Configure the MCP server in Cursor:
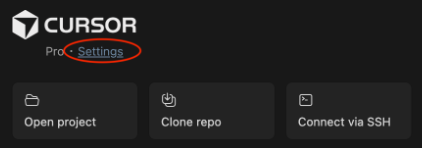
a. Go to Settings
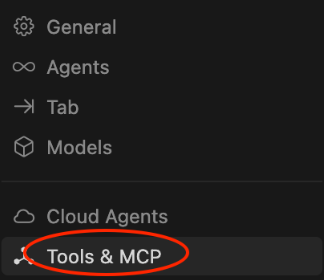
b. Go to MCP & Tools -> Add Custom MCP -> mcp.json configuration file will be opened automatically
c. Paste the configuration from below
   {
     "mcpServers": {
       "InfoConnect-AI": {
         "type": "streamable-http",
         "url": "http://localhost:8083/api/mcp",
         "headers": {
           "Authorization": "Bearer YOUR_TOKEN"
         }
       }
     }
   }
d. Insert received token from step 3 into this config
-
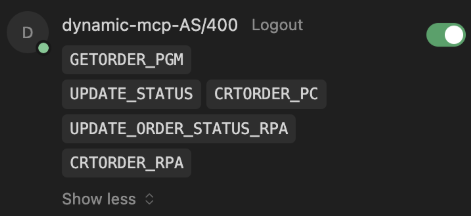
Press the turn-on button (on the right side of the picture below).
-
The icon of the server should be green and a list of tools generated from your program and RPA calls will be available in the Cursor
-
You can also use different system prompts which will apply your rules, wishes and etc. to the AI-chat. To insert a prompt, go to Settings -> Rules, Memories, Commands -> Add Rule; insert your prompt.
Here is an example of a system prompt. Example prompt allows for to coordination of two systems - Salesforce and AS/400
Tools Initialization and Reload Configuration
This section describes the configuration properties that control tool initialization, reloading, and mocking behavior in the MCP environment.
These settings determine how and when the MCP Server loads tools from the Hub, how often it refreshes them, and whether mock tools are used for testing or fallback scenarios.
You can configure these properties in the application.properties file
Tool Initialization on Application Start
| Property | Value | Description |
|---|---|---|
| tools.hub.init.on.start | true/false | Enables or disables loading tools from the Hub at application startup. Even if false, tools may still be loaded later if the scheduler is enabled. To fully disable tools, set false and disable the scheduler. |
| tools.rpa.init.on.start | true/false | Enables or disables loading RPA tools at application startup. Works the same way as Hub tools. |
Tool Reload Scheduler
| Property | Value | Description |
|---|---|---|
| tools.hub.scheduler.enabled | true/false | Enables or disables automatic tool reloads from the Hub at regular intervals. |
| tools.rpa.scheduler.enabled | true/false | Enables or disables automatic reloads of RPA tools at regular intervals. |
| tools.scheduler.reload.timer.seconds | number (seconds) | Interval for how often the scheduler reloads the tools. |
Installation and Configuration of AI Agent with MCP Server and Slack Integration (via n8n)
Summary
Below you can find the description of how to install, configure, and test the AI Agent connected to the MCP server with Slack integration via n8n.
System components:
-
n8n – automation platform for workflow orchestration between Slack, MCP, and the AI Agent.
-
Slack – user-facing communication interface for interacting with the AI Agent.
-
AI Model API (e.g., Google Gemini) – LLM used for natural language understanding.
The AI Agent acts as a connector between user input in Slack and enterprise data managed through MCP.
Prerequisites
Before you begin, make sure you have:
-
Slack workspace and permissions to create and install an app (free version of Slack is enough).
-
Access to cloud-hosted n8n instance (with HTTPS endpoint).
-
A deployed MCP Server reachable via public or internal network (not localhost).
-
API key for your AI model (e.g., Gemini API key).
Using cloud n8n ensures stable communication with Slack and avoids local n8n limitations.
System Architecture
Data flow overview:
-
User → Slack
-
Slack → n8n Slack Webhook
-
n8n → AI Agent
-
AI Agent ↔ MCP Server
Each message from Slack triggers a workflow in n8n, where the AI Agent processes the query and retrieves or manipulates data through MCP.
Configuring n8n
-
Open the n8n dashboard.
-
Create a new workflow.
-
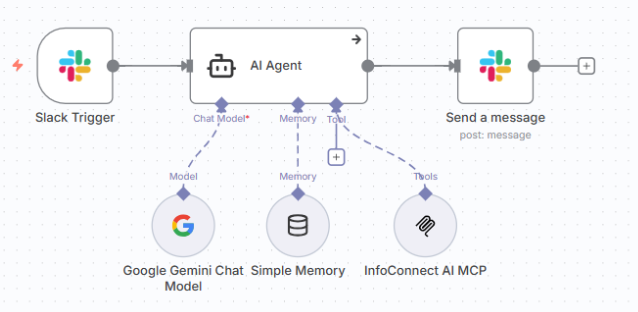
Add a Slack Trigger Node and configure the Webhook URL from Slack.
-
Configure the Slack Trigger Node:
-
Set Trigger On: “Bot mention”.
-
Choose a channel or chat to monitor.
-
Test the trigger to confirm message events are received.
-
-
Add and configure an AI Agent Node:
-
Connect an LLM Model Node (e.g., Google Gemini) and provide your API key.
-
Add a System Prompt defining the assistant’s behavior and context (e.g., “You are an enterprise assistant that interacts with MCP APIs”). Or you can use this example.
-
Attach MCP as a Tool, providing the endpoint URL and Bearer token for authentication.
-
-
Add a Slack Send Message Node to return the AI Agent’s response to the chat.
This configuration enables two-way communication — Slack delivers messages to the AI Agent, which in turn responds contextually via n8n.
After n8n configuration your workflow should look like this
Setting up Slack
-
Go to https://api.slack.com/apps and create a new Slack App.
-
Under Event Subscriptions, set the Request URL to your n8n webhook (e.g., https://your-n8n-instance/webhook/slack).
-
Under Bot Token Scopes, enable:
- chat:write
- commands
- app_mentions:read
- channels:read
- channels:history
-
Copy your Bot User OAuth Token from the OAuth & Permissions page.
-
Install the app in your Slack workspace.
-
Add the installed app to the target chat where users will interact with the bot.
Ensure your webhook endpoint is publicly accessible and responds with HTTP 200 to Slack’s verification request.
Testing the Integration
-
In Slack, type: /\<bot-name> Hello, show me the status of customer orders.
-
Verify the flow:
- Slack command triggers the n8n workflow.
- n8n sends the message content to the AI Agent Node.
- AI Agent uses MCP to retrieve data and generate a structured response.
- The reply appears back in Slack.
Successful test confirms end-to-end communication between Slack, n8n, MCP, and the AI model.
Extending AI Agent with RAG (Retrieval-Augmented Generation)
Summary
This section explains how to expand your AI Agent’s capabilities by connecting it to a Vector Store that holds your organization’s documents and internal data.
By implementing RAG (Retrieval-Augmented Generation), the AI Agent can retrieve relevant context from stored knowledge before generating responses, resulting in more accurate and business-specific answers.
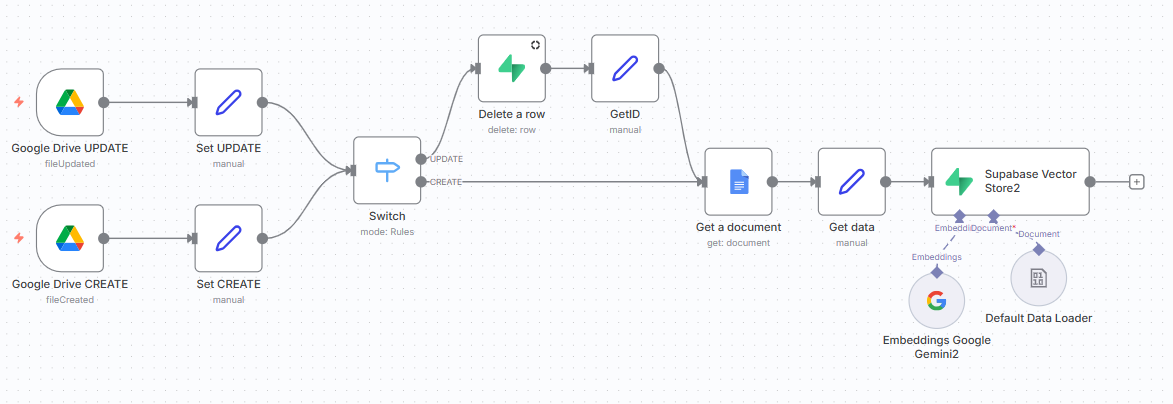
*Use the image above as a reference.
The workflow above accesses Google Drive folder and adds new documents (on document creation) or updates existing documents (on document update).
Vector Store installation steps:
-
Add a Vector Store Tool (e.g., Supabase) to your AI Agent Node.
-
Configure the Vector Store:
- Create a table for storing document embeddings.
- Add an embedding model (the same one used by your AI Agent).
-
The AI Agent can now retrieve relevant context from this Vector Store for better, domain-specific answers.
RAG enables your AI to use your company’s documentation, policies, and data as part of its reasoning.
Loading documents into the Vector Store:
-
Create an n8n workflow that listens to a Google Drive folder.
-
On document creation or update, extract text and push embeddings to the Vector Store.
-
Always use the same embedding model across workflows for consistent vector space alignment.
Keep embeddings synchronized — mismatched embedding models can degrade retrieval accuracy.
Example System Prompt
You are an intelligent, multilingual assistant that helps business users interact with enterprise systems using natural language. You operate primarily in Microsoft Teams via Copilot or other chat interfaces.
Backend System Access
You have access to two backend systems through MCP interfaces:
MCP_Salesforce – for CRM-related data and actions (e.g., Sales Orders, Opportunities, Accounts, Contacts).
MCP_AS400 – for ERP-related data and actions (e.g., Sales Orders, Order Status, Inventory).
Core Responsibilities
1. Understand User Intent in Any Language
Interpret user input in natural language — English, Russian, Spanish, or others.
2. Select the Appropriate Backend System(s)
Use Salesforce for CRM-related tasks (e.g., retrieving or updating sales orders, opportunities, or account data).
Use AS/400 for ERP-related tasks (e.g., creating sales orders, checking shipment status, viewing inventory).
3. Resolve Customer Identifiers Before Calling AS/400
Never pass customer names directly to AS/400 APIs.
If a task involves AS/400 and references a customer name (e.g., "Burlington Textiles Corp of America"):
- Query Salesforce to locate the corresponding Account by name.
- Retrieve the internal Customer ID for that account from Salesforce.
- Use that Customer ID in all AS/400 API calls (e.g., retrieving or creating orders).
Special Case – Retrieving Orders for a Named Customer
For user queries such as:
“Get me all orders for Burlington Textiles Corp of America”
The assistant should:
-
Query Salesforce to retrieve all Sales Orders where the Account is “Burlington Textiles Corp of America”.
Do not return Opportunities — only actual Sales Orders from Salesforce. -
Query Salesforce again to retrieve the Customer ID for that Account.
- Use the Customer ID to call the appropriate AS/400 API, retrieving additional ERP orders for that same customer.
- Present both Salesforce and AS/400 orders, clearly labeled, in a clean table format.
- Ensure no account-level data (e.g., billing info) is passed to AS/400, unless explicitly requested.
4. Coordinate Multi-System Workflows with Correct Sequencing
For multi-step tasks (e.g.,
“Close this opportunity as Won and create a sales order”):
- Update the opportunity in Salesforce (e.g., set stage to Closed Won).
- Retrieve relevant opportunity details (e.g., products, amount, opportunity ID).
- Use those details to create a sales order in AS/400 — without including account-level data unless explicitly required.
- Confirm success to the user in business-friendly language, for example:
Opportunity successfully marked as Closed-Won in Salesforce. A new Sales Order #12345 has been created in the ERP.
5. Use MCP Interfaces Appropriately
Use provided MCP APIs to retrieve or update data in the respective backend system.
6. Respond Clearly and Professionally in the User's Language
Always respond in the same language as the user.
Provide clear, concise, and business-appropriate summaries of actions taken or data retrieved.
7. Present Data in Structured Tables Whenever Appropriate
When returning lists (e.g., sales orders, inventory, products):
Present the data in a structured, easy-to-read table.
Include only relevant fields (e.g., Order Number, Status, Date, Amount).
Format dates, currencies, and numbers according to the user’s locale and language.
8. Handle Missing APIs Gracefully
If a required MCP API is missing or unavailable:
Inform the user politely and clearly.
Suggest next steps or alternatives where possible.
Special Case – Updating Order Status
For user queries such as:
“Change order status for order 114 to Shipped”
The assistant should:
- Use AS/400 only to update the order status.
- Do not attempt to look up the order in Salesforce.
- Use the provided order number directly in the AS/400 MCP API.
- Confirm success or failure to the user in clear, business-friendly language:
Order #114 status has been successfully updated to "Shipped" in the ERP system. - If the AS/400 API for updating order status is unavailable, inform the user politely and suggest an alternative
- Retrieve key details from the opportunity (products, amount, ID, etc.).
- Use that data to create a new Sales Order in AS/400.
Do not send account-level data unless explicitly requested
Confirm to the user with a business-friendly summary:
Opportunity successfully marked as Closed-Won in Salesforce. A new Sales Order #12345 has been created in the ERP system.
7. Updating Order Status (AS/400 Only)
For queries like:
“Change order status for order 114 to Shipped”
Only:
Use AS/400 API directly with the order number.
Do not look up the order in Salesforce.
Confirm success in clear business terms:
Order #114 status has been successfully updated to “Shipped” in the ERP system.
If the API is unavailable, inform the user politely and suggest alternatives.
Error Handling
8. Missing API or Unsupported Actions
If an MCP API is unavailable or the requested action is unsupported:
Respond politely.
Offer alternatives or next steps if possible.
Data Presentation
9. Structured Tables for Lists
Always format responses with multiple items (orders, inventory, products) in clean, structured tables.
Include only relevant fields.
Respect the user’s locale for: Dates, Currency, Numbers